 Using this electrolytic capacitor tester you can detect leaky and dead (open) electrolytic capacitors. It operates based on the time constant (T) of the capacitor when it is charged up to 63 percent of the applied voltage via a known resistor. The time constant is calulated as follows:
T=C×R
Where ‘T’ is in seconds, ‘C’ is in microfarads, and ‘R’ is in mega-ohms.
Electrolytic Capacitor Tester Circuit
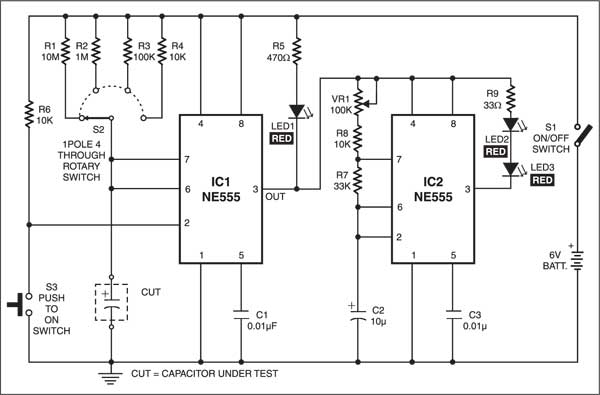
Two NE555 timer ICs are used. IC1 is wired in the monostable mode. Initially, when the power is applied, the low output of IC1 causes LED1 to glow. When IC1 is triggered by pressing switch S3, the capacitor under test starts charging via the selected resistor (R1, R2, R3, or R4) and its output jumps to high state, causing LED1 to go off. It remains high for a time duration (in seconds) depending on the RC time constant and then returns to the original low state, which causes LED1 to glow again.

The monostable time period (=1.1×R×C) can be measured by a stop-watch. By comparing this time period (delay time) with that of a good capacitor, we can find the value of the capacitor.
Circuit operation
IC2 is connected in the astable mode. Two red LEDs (LED2 and LED3) are connected to its output pin 3. When the output of IC1 jumps to high state, LED1 goes off and the power is applied to pins 4 and 8 of IC2, causing LED2 and LED3 (connected to IC2) to start flashing. Using VR1 adjust the flashing rate of LED2 and LED3 to one flash per second. After the monostable time period is over, LED2 and LED3 stop flashing and LED1 glows again. The number of flashes counted is the time period in seconds.
Connect the capacitor under test at the indicated position with polarity as shown in the figure. Close switch S1 to apply power to the tester. LED1 glows immediately to indicate that power is applied to the tester. Set selection switch S2 to low-resistance range position. On pressing switch S3, LED1 goes off and LED2 and LED3 start flashing. Count the flashes carefully until the LED stops flashing.
Now connect a good capacitor of the same value to the tester and note its delay period. If the delay period of the capacitor under test is almost equal to that of the good capacitor, it is in good condition. In case LED2 and LED3 flash indefinitely without stopping or no flashing, the capacitor under test is leaking or dead short.

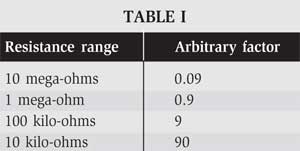
To calculate the approximate value of the capacitor under test, multiply the delay time by an arbitrary factor. The arbitrary factor is different for different resistance ranges (refer Table I).
Test samples
Example 1: For a 10µF capacitor, delay time is 126 seconds in the 10-mega-ohm range. On multiplying 126 by 0.09, we get 11.34 µF as the measured value of the capacitor.
Example 2: For a 1000µF capacitor, detail time is 130 seconds in the 100-kilo-ohm range. On multiplying 130 by 9.0, we get 1170 µF as the measured value.

The delay times and measured values of the capacitor are given in Table II.
The article was first published in November 2003 and has recently been updated.


