
Ever since the UK variant of Covid19 hit our country towards the end of March-21, in a span of two weeks we have more than 300 active cases in our small township. Everyday one department or other is hit by one or two of their employees diagnosed as positive. The ‘positive’ words itself is the most negative & hateful word of the English lexicon now.
To scan all our employees of our department at the entry point, here’s one touchless temperature scanner which is otherwise like most other touchless sensor to monitor body temperature except that every time it senses temperature, it speaks up either you are OK or you have fever and then it uploads the data into a cloud – thingspeak.com
It has several free GPIOs anyone of which can be programmed to operate a shutter driven camera also but that is not considered here in this project.

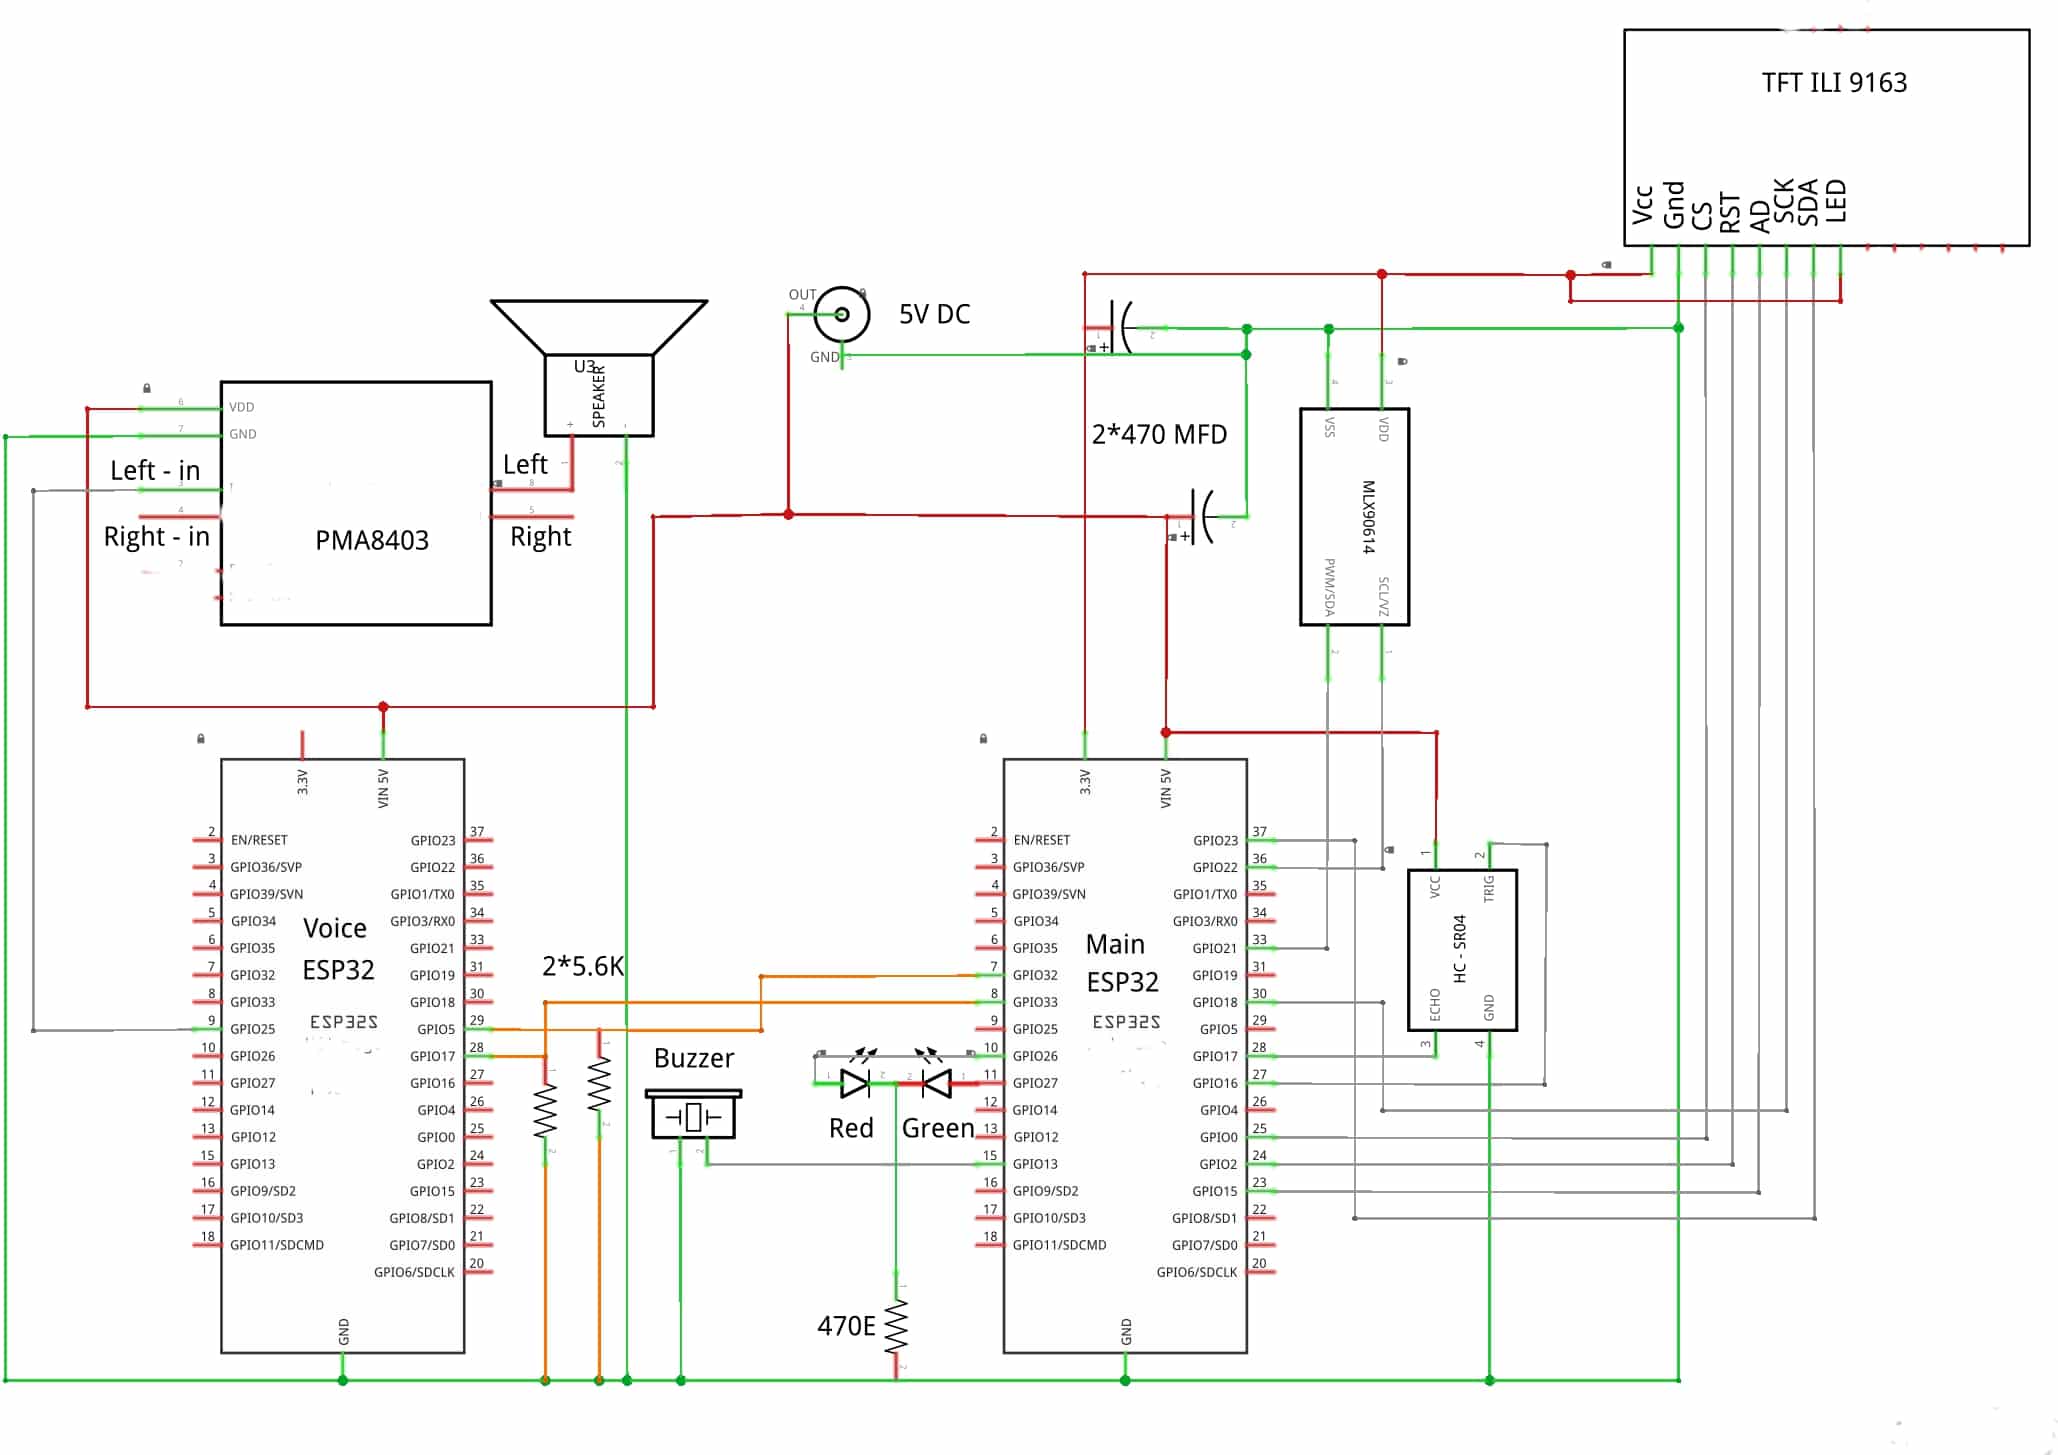
To measure the temperature when only the object comes close to its proximity closer than 5cm, an ultra sonic HC-SR04 sensor is used to measure the distance , the temperature is measured, the DAC is fired to speak up the result at the same time the data is uploaded to the cloud.
The ESP32 has two DAC GPIOs – 25 & 26. We have latched onto pin 25 for speaking up two 8 khz WAV files [in C code] depending upon the temperature is below 99 Deg F or above 99 Deg F ( Alternatively below 37 deg Celcious or above 37 degree Celcious) A special library file is used for deploying this capability. A 5 Volt operated small audio amplifier – PAM8403 Stereo Audio Amplifier Board is used to make the voice audible through a 8 OHM 3 watt speaker.
When the temperature is more than or equal to 99 Degree Fahrenheit, an audio alarm is also generated in the peizo buzzer and an LED blinks. The complete view of a diagnostic center!
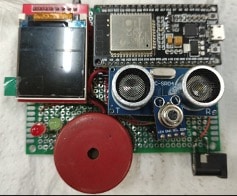
All this is built using one or two ESP32, a 5Volt adapter, and a small audio amplifier,. 5Volt is essential as the HC-SR04 works on 5Volt supply. The WiFi internet is used to upload data to the cloud server [thingspeak.com]. In case you have a camera whose shutter can be activated by a solenoid, the ESP32 can operate that camera as well using little changes in the code! Such that when it senses a temperature above 99, it will activate that GPIO to click the shutter to take a snapshot of the person.
Multiple network can be set with SS ID and passwords such that whichever works, will be connected & used to transfer data to the cloud. See the SSID and Password section of the sketch. Replace the SSID & passwords as per your SSID & passwords.
// DEFINE HERE THE KNOWN NETWORKS
const char* KNOWN_SSID[] = {“bera1”, “bera.”, “.bera”,”NTPC_WiFi”};
const char* KNOWN_PASSWORD[] = {“12345678”, “34567890”, “5566789014”,”ascdefgh”};
const int KNOWN_SSID_COUNT = sizeof(KNOWN_SSID) / sizeof(KNOWN_SSID[0]);
// number of known networks
BOM: Source = [calcuttaelectronics.com robu.in amazon.in]
- The costliest item is the MLX90614= INR1000 ~ INR 1500
- ESP32: INR 500*2
- HC-SR04: INR 150
- TFT ILI9163 = INR 500
- 5volt adapter = INR150
- PAM8403 = INR50
In less than INR 3,000 this can be built.
Schematic
Since sound play and colour display takes enormous computing power, if we load everything into one ESP32, the sound play and display both will be highly disturbed and quality will be hit. To solve this problem we have used two ESP32 – Main ESP32 and Voice ESP32.
Voice ESP32
We have just loaded a few voice files and programmed it in such a way that the voice files are played back when particular GPIOs are made HIGH. Here we have loaded two voice files – “You are OK” and “You have fever”. You can add more voices to play with several other conditions. However, make then small and 8 KBit sampling rate only.
Main ESP32
This is the main ESP32 connected with ILI 9163 color TFT display, HC-SR04 Ultrasonic ranger and MLX90614 IR temperature sensor. Optionally you can load it with voice codes and connected with a PMA8403 amplifier board and speaker as well but it will severely limit the display capacity. Only one temperature data can be shown, more character display will be restricted. Therefore, this ESP32 is only responsible for sensing distance and when the distance is well within range [2cm to 15 cm], will capture the body temperature, read it and flag it with ‘fever condition’ or ‘OK condition’. Connect to the WiFi network and upload to the cloud. While doing so it will fire up a few GPIOs to run a buzzer, few LEDs and give commands to the ‘Voice ESP32’ to play the suitable voice audio.
Temperature>=99 is “Fever condition” and Temperature <99 is “OK Condition” . At Fever condition the buzzer will beep and the display will be Red colored. Both the ESP32s may be powered from one power adapter or from two separate power sources. However, their common ground lines are to be connected together.
The speaker connection is taken through PAM8403 ampli-board from GPIO pin 25 & Gnd. The power supply for the ampli-board is taken from 5Volt and Gnd. The output is played on an 8 OHM speaker from the PAM8403 ampli-board. The 5V DC supply preferably 2 AMP or more to be applied to the 5V supply line as shown in the schematic. More power is required due to amplification of the PMA8403 board. The 3.3Volt supply is made by the on-board voltage regulator of the ESP32s.
Creating WAV files
Most of the heavy load lifting is done by the XT_DAC_Audio library from xtronical.com. The library can be downloaded from this url or you can get it from the library resources that I have included in this project.
[Windows users] is the circuitous ways …
Next what you have to do is convert your choice of audio wav file into [8 khz sampled rate] C file in HEX format. There are many online sound converter sites [eg fromtexttospeech.com ] which takes up your texts and converts it to your choice of sound files [mp3, wav, ogg etc]. Please ensure that this file is a 8 KHz PCM wav file.
After that the 8 khz wav file will be converted to hexadecimal C code by using another software HxD from mh-nexus.de which finally becomes a simple text like file which we name it as fever.h and ok.h.
In case it’s a rich wav or mp3 sound file then you have to use another software – audacity to convert it to 8 KHz wav sound format. Audacity is available from audacityteam.org
fever.h says = “You have fever”
ok.h says = “You are OK”
[Linux ways] the easier one …
Two softwares required – gtts-cli [Google text to sound software] and xxd. Both can be installed from the command line using the commands below.
sudo pip3 install gTTS // installs Google Text to Speech python utility.
sudio apt-get install xxd //This installs xxd software
To convert a text into an wav file is straight forward and to convert that wav file into an hex coded C file is just by yet another straight forward command.
// gtts-cli “You have fever” -l en -o fever.wav
Open this file in audacity music editor and export it as 8 khz PCM wav file format
// xxd -i fever.wav fever.h
// gtts-cli “You are OK” -l en -o ok.wav
Open this file in audacity music editor and export it as 8 khz PCM wav file format
// xxd -i ok.wav ok.h
Drop both these files in the same Arduino sketch folder and you are ready to impress your department & neighbors now.
Operation
MLX90614 is an I2C device. A factory made default I2C address is 0x5A However, to add more MLX90614 on the same MCU, one needs to change the I2C address. A separate sketch is also added to make the device talking to different I2C addresses. If the object is more than 5cm, it will suggest to come close. Once it is close, it will measure the temperature. Speaks up – “You are OK” or “You have fever” depending upon the range of temperatures measured. After showing of distance & temperature on the TFT, next 10 seconds will be used up for sending the data to the cloud server – thingspeak.com.
To make the data transfer continuous & fast you may have to buy the cloud space from thingspeak.com or any other cloud server or you can have your own company cloud server for uploading non stop unlike 15 seconds gaps of thingspeak.com free cloud.
The small stereo amplifier board PMA8403 works on 5volt and the output goes to a 8 OHM 3 watt speaker. Only one channel of the amplifier board is used.
This is my prototype and this is how it is deployed at my office.
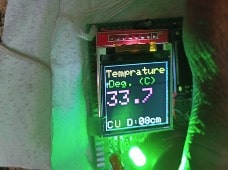
C = Connected to WiFi, U = Data Uploaded, D = Distance
Temperature is shown in Deg Centigrade.
Any form of ESP32 / ESP32S or ESP32 S2 will work for this project. Please ensure the GPIO numbers while connecting them.
Working of Voice ESP-32
This ESP32 is programmed to fork up & play a few 8 kbits PCM audio wav file out of its RAM memory. In this project we have loaded it with three audio files and are programmed in a way such that when GPIO Pin – 17 is made HIGH, “You are OK” sound is played. The GPIO-17 HIGH of Voice-ESP32 is originated from the GPIO-33 of ‘Main-ESP32’ chip. To avoid false triggering, it’s advised to connect a 5.6K OHM resistor to GPIO-17 & ground.
In the same way when GPIO-5 of ‘Voice-ESP32’ is made high, “You have fever” sound is played. The GPIO-5 HIGH is originated from GPIO-33 of ‘Main ESP-32’ chip. To avoid false triggering, it’s advised to connect a 5.6K OHM resistor to GPIO-5 & ground.
If the GPIO-16 of ‘Voice ESP-32’ is made high ‘You are welcome’ sound will be played but this I did not use here. It’s upto you now to apply your ingenuity to deploy this sound.
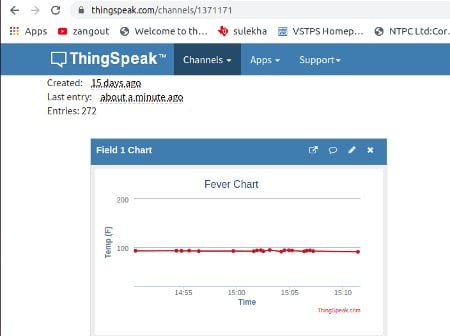
Thingspeak cloud
A very popular IOT cloud to host your sensor feedback data using cheap WiFi enables devices – ESP8266, ESP32, WiFi enables Arduino etc. Go to thingspeak.com, create a login using your credentials [Name, Age, email address etc…] and then there are two types of memberships available for you to choose. The commercial user is a paid one for which you can upload one data [maximum 8 data per page] per second while for the free users you can upload one data [maximum 8 data per page] per 15 seconds. After successful login you will get one ‘Write authorization Key’ , a 16 character nasty meaningless key by which you can send data to the thingspeak server. You can declare your page as public or private. If declared public anybody opens that URL in their browser, will be able to see the trend curve of the following eight data ( val[0] to val[7] in 8 trend curve )
https://api.thingspeak.com/update.json?api_key=”YourWriteKey” &field1=”.String(val[0]).” &field2=”.String(val[1]).”&field3=”.String(val[2]).”&field4=”.String(val[3]).”&field5=”.String(val[4]).”&field6=”.String(val[5]).”&field7=”.String(val[6]).”&field8=”.String(val[7].”)”;
If you run that command in any browser or through GET command of ESP32, it will transfer 8 data at a time to the thingspeak server to host. Then open your thingspeak page and impress your neighbourhood.
My channel on thingspeak.com is hosting only one data [fever data]