


ESPHome is an open source system for macOS, Linux, and Windows, comprising two primary components: Bluetooth proxy for Bluetooth low energy (BLE) sensor integration and ESPHome Automation for Wi-Fi-based smart home devices.
It supports microcontrollers like ESP32, ESP32-S2/S3/C3, ESP8266, and the Raspberry Pi Pico W, though the Bluetooth Proxy feature is exclusive to ESP32. The Pi Pico W currently faces limitations, as it is not displayed on the ESPHome dashboard or the browser.
POC Video Tutorial
This system turns microcontrollers into efficient home automation tools, enabling simple sensor and actuator connections with minimal programming. Through an intranet browser, users can control LED brightness, toggle switches, manage buzzers, monitor gas sensors like MQ135, and share data globally via MQTT.
This is automation at its core—streamlining control and monitoring for a more intelligent home. The best part is that setting up the ESP32 or ESP8266 is straightforward.
| Bill of Materials | |
| Components | Quantity |
| ESP32 development board (MOD1) | 1 |
| DHT22 sensor (S2) | 1 |
| ATH10 sensor (S1) | 1 |
| Power supply: 5V regulated DC | 1 |
| Resistor: 220Ω (R1, R2) | 2 |
| Resistor: 4.7kΩ (R3) | 1 |
| LED1, LED2 | 2 |
| MQ135 sensor (optional) | 1 |
Bluetooth Proxy
Bluetooth devices have been part of daily life for years, yet integrating them into home automation has always been challenging. This is one reason Zigbee has remained a preferred choice. However, ESPHome Automation introduces an effective alternative.
Nearby BLE devices automatically connect by setting up an ESP32 as a Bluetooth proxy. The data from these devices becomes visible on the ESPHome dashboard under the ‘ESPHome Bluetooth Proxy’ device.
It is important to note that the ESPHome Bluetooth Proxy is not designed to connect directly to mobile phones or appear in a phone’s Bluetooth settings like a standard Bluetooth device. Instead, it bridges Home Assistant and nearby BLE devices, such as temperature sensors, smart bulbs, fitness bands, or other smart home peripherals.
In Bluetooth proxy mode, the ESP32 does not advertise itself as a connectable device (e.g., a speaker or keyboard). Instead, it listens to nearby BLE devices and silently forwards the data to the Home Assistant. There are no notifications or pairing prompts.
You need to check the logs to confirm that it is working—it will notify you when it ‘finds a new device.’ The simplicity and power of this silent integration make Bluetooth proxy a revolutionary feature in home automation.
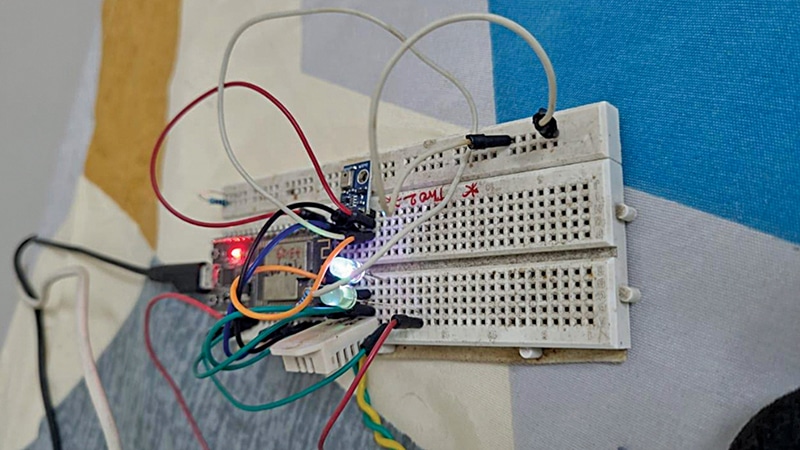
The components required for the automation system are listed in Table 1. The author’s prototype, built on a breadboard, is shown in Fig. 1, where the ESP32 controls LEDs through PWM.
Installation Guide
Follow this installation guide to run the automation system using ESPHome on Windows, macOS, or Linux. ESPHome Automation is primarily a Python package installed via pip.
Prerequisites
Ensure Python (version 3.7 or higher) is installed on the system. Verify it using:
$ python --versionTo install ESPHome via pip, open a terminal and run:
$ pip install esphomeVerify the installation:
$ esphome versionVersion: 2024.10.3 (confirms ESPHome is installed.)
Optional: Install the ESPHome dashboard
(Note: As of the latest version, the ESPhome dashboard is included with ESPHome and does not require separate installation.)
$ pip install esphome-dashboard# Only if needed for older versions
Prepare a working directory
Create a directory where all ESPHome YAML files will reside:
$ mkdir /Users/somnathbera/esphome
$ cd /Users/somnathbera/esphome
The message appears on the screen: ‘Navigate to the directory.’
Create and compile the YAML configuration.
• To create a blank YAML file for your device:
$ esphome wizard my_device.yaml• To compile and upload the YAML file to your device:
$ esphome run my_device.yamlThe message appears on the screen: ‘Keep your device connected to the serial port’
Tip: The ESPHome dashboard can be used instead of the terminal for those who prefer a graphical interface.
Using ESPHome dashboard (GUI)
To start the ESPHome Dashboard, run:

