


 Since Internet of Things (IoT) projects are now quite popular, I recently bought a NodeMCU board to try IoT application development. The NodeMCU development board is an open source board based on ESP8266EX microcontroller with integrated Wi-Fi transceiver. Uploading programs to NodeMCU from any computer via microUSB port is very easy as it supports several programing languages. This makes NodeMCU a smart choice to play with the IoT.
Here I explain how to get started with NodeMCU board using some common tools including Arduino, PuTTY, LuaLoder and ESPlorer.


Fig. 1: NodeMCU versions
NodeMCU board comes in two popular versions: NodeMCU v0.9 with ESP12, and NodeMCU v1.0 with ESP12E (refer Fig. 1). NodeMCU v1.0 is the current version, which is not only breadboard-ready but also has some extra GPIOs (Fig. 2).

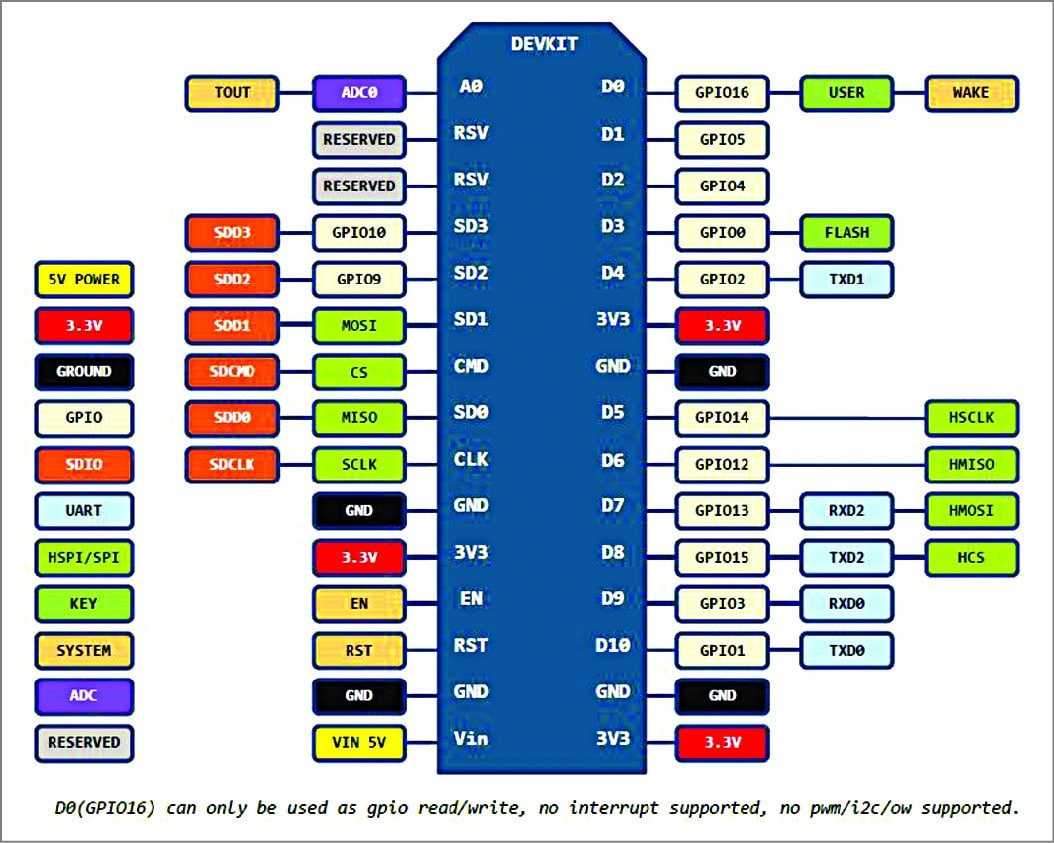
Fig. 2: NodeMCU v1.0 pinouts
First, run NodeMCU and Lua
Most NodeMCU boards come with updated Lua firmware for operating in Windows platform. If it’s not included in your board, first refer to Firmware Flashing in the next section. Before using NodeMCU board, you need microUSB driver for Windows PC. Download driver from http://www.silabs.com/products/mcu/Pages/USBtoUARTBridgeVCPDrivers.aspx, and install it in your Windows PC. Next, connect NodeMCU board to the computer through USB interface. Fig. 3 shows ‘Device Manager’ window of Windows 7 (x64) showing connected port of NodeMCU as COM35 here.

Fig. 3: Windows Device Manager
Now, you can test the onboard LED in Lua shell. The on-board blue LED (GPIO16 –DO) signals execution of the procedure. Before this, also download and install the PuTTY terminal software in your computer.
With NodeMCU connected to your PC, run PuTTY to get into its Lua shell.
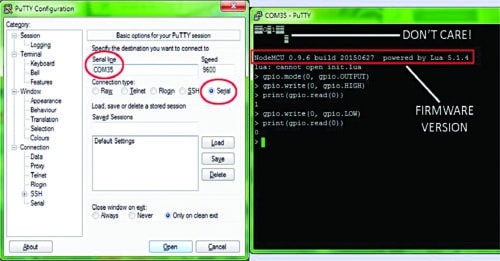
Fig. 4: Lua shell window
If NodeMCU is not detected by the software, press its reset (RST) button. Once NodeMCU is detected, enter the following code in the Lua shell window (refer Fig. 4) to test the onboard LED:
gpio.mode (0, gpio.OUTPUT)
gpio.write (0, gpio.HIGH)
print (gpio.read(0))
gpio.write (0, gpio.LOW)
print (gpio.read(0))
If everything is okay as per the hardware configuration, “gpio.write (0, gpio.HIGH)” turns off the LED, and “gpio.write (0, gpio.LOW)” turns on the LED. In the Lua shell window, the first line seems like some garbage data. This is usual, you just have to ignore that.
Actually, these are random characters sent at a different baud rate but appear as garbage at normal rates.
NodeMCU with Arduino IDE
NodeMCU can be easily programmed through Arduino IDE (1.6.9). Here is the code to change the onboard blue LED to blink like a breathing LED:
// Breathing LED on NodeMCU v1.0
(Breathing.ino)
// Arduino IDE 1.6.9
// Based on a code published in
arduining.com
#define LED D0 // Blue LED in NodeMCU at
pin GPIO16 (D0)
#define BRIGHT 350 //max LED intensity
(1-500)
#define INHALE 1250 //Inhalation time in
milliseconds
#define PULSE INHALE*1000/BRIGHT
#define REST 1000 //Rest Between
Inhalations
void setup() {
pinMode(LED, OUTPUT); // LED pin as
output
}
void loop() {
//ramp increasing intensity, Inhalation
for (int i=1;i<BRIGHT;i++){ digitalWrite(LED, LOW); // turn the LED on delayMicroseconds(i*10); // wait digitalWrite(LED, HIGH); // turn the LED off delayMicroseconds(PULSE-i*10); // wait delay(0); // prevent watchdog firing } //ramp decreasing intensity, Exhalation (half time) for (int i=BRIGHT-1;i>0;i–){
digitalWrite(LED, LOW); // turn the
LED on
delayMicroseconds(i*10); // wait
digitalWrite(LED, HIGH); // turn the
LED off
delayMicroseconds(PULSE-i*10); // wait
i–;
delay(0); // prevent watchdog firing
}
delay(REST); //take a rest
}
To program NodeMCU in Arduino IDE, install esp8266 board (ESP8266 core for Arduino) to Arduino IDE by following these simple steps:
1. Open Arduino IDE and select ‘Preferences’ via ‘File’ menu
2. Type http://arduino.esp8266.com/stable/package_esp8266com_index.json in the field for ‘Additional Boards Manager URL’
3. Select ‘Boards Manager’ from ‘Tools’ menu
4. Under ‘Boards Manager,’ scroll until you find ‘esp8266’ board
5. Select the latest version and install
6. Select the board via ‘Tools’ menu (see Fig. 5)
7. Finally, copy, paste and then upload ‘Breathing.ino’ sketch
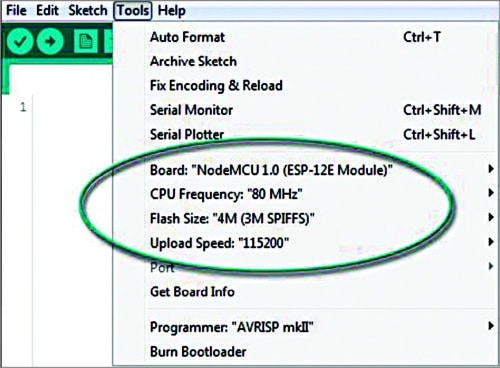
Fig. 5: NodeMCU details on Arduino IDE
NodeMCU firmware flashing
Once the board is programmed through Arduino IDE, the original firmware will be erased. For some reason, if you want to restore the original firmware with Lua shell, you should flash the firmware again.
NodeMCU Flasher (https://github.com/nodemcu/nodemcu-flasher) is a popular firmware flash tool for Windows platform. After downloading and installing NodeMCU Flasher, download the latest NodeMCU firmware (https://github.com/nodemcu/nodemcu-firmware/releases).
At the time of writing this article, there are two versions for each firmware: integer (which supports only integer operations) and float (which supports floating-point calculations). From the performance point of view, the integer version is better. Here, the firmware (.bin) required is nodemcu_integer_0.9.6-dev_20150627.
The steps to flash the firmware using NodeMCU Flasher are:
1. Connect the board to the computer through USB interface
2. Open NodeMCU Flasher. In ‘Config’ menu, add the nodemcu bin file on 0x00000 column (refer Fig. 6(a) and (b))
3. Press ‘Flash’ button under ‘Operation’ menu (Fig. 6(b)), and wait
After a few seconds, the flashing process should complete. From my experience, you will need to reboot the board in order to connect it to the PC. To resolve connection problem, you can unplug and then plug in the board to the PC again, or press reset (RST) button on the board.
NodeMCU and Lua development
The architecture of NodeMCU and availability of many Lua IDEs allow it to be programmed independently, without the need of other microcontrollers like Arduino, for example. I’ve found a simple IDE called LuaLoder that can be used for NodeMCU Lua development (https://github.com/GeoNomad/LuaLoader). LuaLoder allows you to upload Lua files, execute them, and also interact with the board without undue difficulties. The screenshot of LuaLoder window is shown in Fig. 7.
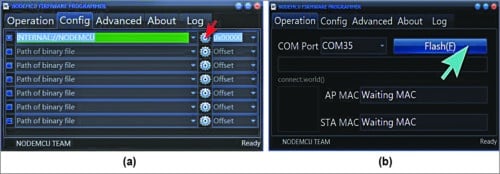
Fig. 6: Firmware flashing process: (a) In ‘Config’ menu of NodeMCU Flasher, add the bin file on 0x00000 column; (b) Press ‘Flash’ button under ‘Operation’ menu
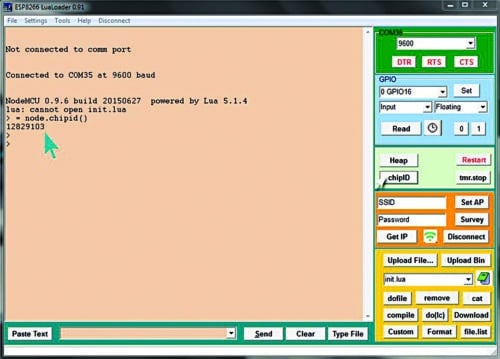 Fig. 7: LuaLoder displays unique chip ID of the connected board
Another IDE is ESPlorer (https://github.com/4refr0nt/ESPlorer). Actually, these IDEs are for uploading files to the ESP8266 and working with the Lua serial interface. They are compatible with almost all versions of Windows, with terminal windows to show the output from the ESP8266 UART.
Terminal windows also let you type or paste commands for immediate interpretation and execution. A selection of buttons is available to automatically type frequently used commands and to select files for uploading to the ESP8266 file system.
At first I got a bit scared by the complex Lua structures. Later I enjoyed playing with NodeMCU and it has been working great for about a month with only a few hiccups. Well, good luck for all your projects!

I recently purchased Node Mcu ,which has build in Bluetooth and Wifi.
how to turn on the bluetooth and how to bind another device MAC id to hte board?
How to connect Node MCU to Local Server for Home Automation