


6. Fill the name dcm in the entity field and enter CLOCK_50MHz and RST as input ports and LOCK and CLOCK_100kHz as output ports, and click Next and then the Finish button.
7. Select ClockDivider.vhd in the sources window and then click on New Source.
8. In New Source Wizard, select IP (Core Generator and Architecture Wizard) and enter DCM_Divide in the File name field and click Next.
9. In the Hierarchy window, ClockDivider.vhd is added as shown in Fig. 5 and a new skeleton source is created with defined inputs and outputs as shown in Fig. 6.
10. The Select IP window appears on the New Source Wizard (Fig. 7). Click on View by Function. Select FPGA Features and Design → Clocking → Virtex-5. Your selection will depend on the FPGA series you are using.
11. Select Chose Wizard by Basic Function → Double Clock Frequency (DCM). Click Next and then Finish.
12. Xilinx Architecture Wizard-Setup window appears as shown in Fig. 8. Confirm that the Output File Type VHDL is selected, synthesis tool XST is selected and part number xc5vlx50-1ff676 is selected. (The part number should be the same as the part number entered by the designer earlier.)
13. Then the Xilinx Clocking Wizard—General Setup appears as shown in Fig. 9.
14. Enter 50 in the Input Clock Frequency field. Select CLKDV output and select 10 in the Divide by Value drop-down box (Fig. 9).
15. Click Next, Next and Finish to close the wizard.
16. DCM_Divide.xaw is added to the list of project source files as shown in Fig. 10. It contains the architecture wizard settings.
17. Select DCM_Divide.xaw. In the Processes tab for sources window, double click View HDL Instantiation Template. An HDL implementation file DCM_Divide.vhi opens. It comprises two items, namely, component declaration (Fig. 11) and component instantiation as shown in Fig. 12.
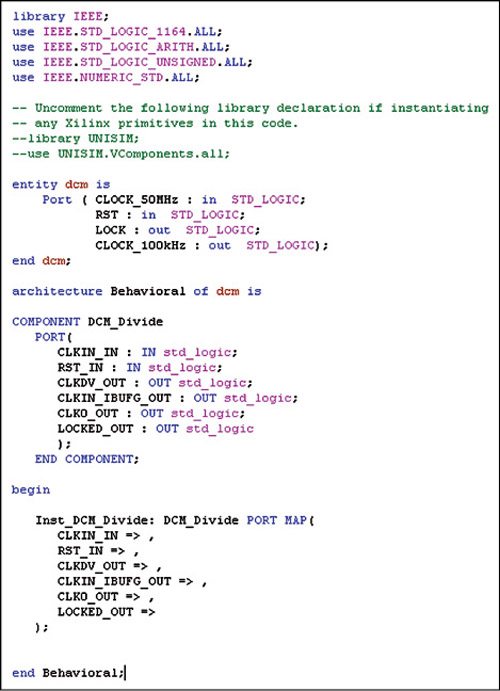
18. Copy the component declaration template and paste it in the ClockDivider.vhd file in the space between ‘architecture Behavioral of dcm is’ and ‘begin’ statement as shown in Fig. 13.
19. Copy the component instantiation template and paste it in the ClockDivider.vhd file after the ‘begin’ statement as shown in Fig. 14.
20. Make the changes in the instantiation code as given below:
[stextbox id=”grey”]
Inst_DCM_Divide : DCM_Divide PORT
MAP(
CLKIN_IN => CLOCK_50MHz,
RST_IN => RST,
CLKDV_OUT => CLOCK_100kHz,
CLKIN_IBUFG_OUT => open,
CLK0_OUT =>CLK0 ,
LOCKED_OUT => LOCK
);
[/stextbox]
The final output of ClockDivider when compiled should give a ‘…completed successfully’ message as shown in Fig. 15.

21. In our example, we are connecting the input clock CLOCK_50MHz directly to the DCM and taking the divided clock output CLKDV_OUT as the final output CLOCK_100kHz. After compilation, load the code into the device. The CLOCK_100kHz port generates 100kHz output, which you can verify from the oscilloscope. This signal can be used anywhere as required in the program.
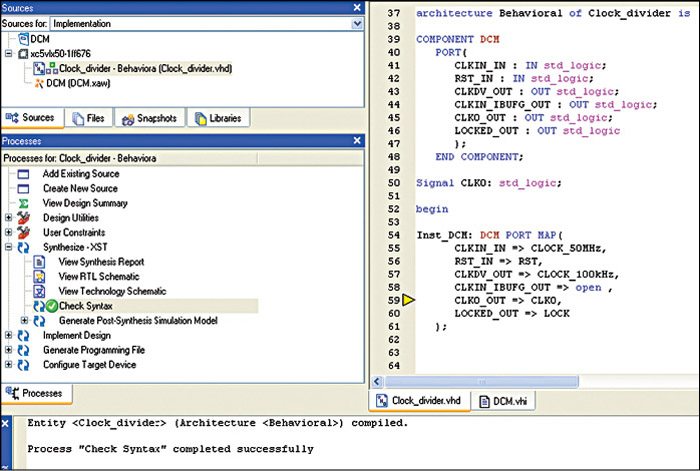
In case one needs to use the inputs and outputs of the DCM internally, they have to be declared as signals. To use CLK0_OUT clock output internally, it is portmapped to CLK0 which is declared a signal as shown below:
[stextbox id=”grey”]“signal CLK0: std_logic;”[/stextbox]
Conclusion
This part described how to generate a clock of the desired frequency using DCMs in FPGAs. The concluding part will talk about embedded processor design using FPGAs.
Varsha Agrawal is a scientist at Laser Science and Technology Center (LASTEC), a premier DRDO lab working in the field of laser-based defence systems. She has more than 13 years of R&D experience in the design and development of a variety of systems for defence-related applications. She has authored two books and published more than 20 research papers and technical articles