


This simple fingerprint door unlock project using Arduino can be very useful for door security, forensics, crime investigation, personal identification, attendance system and much more. In the future, there could be many more applications like fingerprint based driving licences, bank accounts operation and so on.
The whole system works under a simple algorithm called matching algorithm, which is used to compare previously-stored templates of fingerprints against users’ fingerprints for authentication purposes.
A key is normally used for traditional door opening, but it provides very poor security. In this fingerprint door unlock project, only when an authorized person places a finger on the sensor, the door unlocks and the LCD displays a welcome message along with that person’s name.

Circuit and working
The circuit shown in Fig. 1 operates using a 12V power supply. An Arduino microcontroller (MCU) requires only 5V but the solenoid electric lock requires 12V. As Arduino Uno has an inbuilt 5V voltage regulator, a common 12V supply can be used for the whole system.
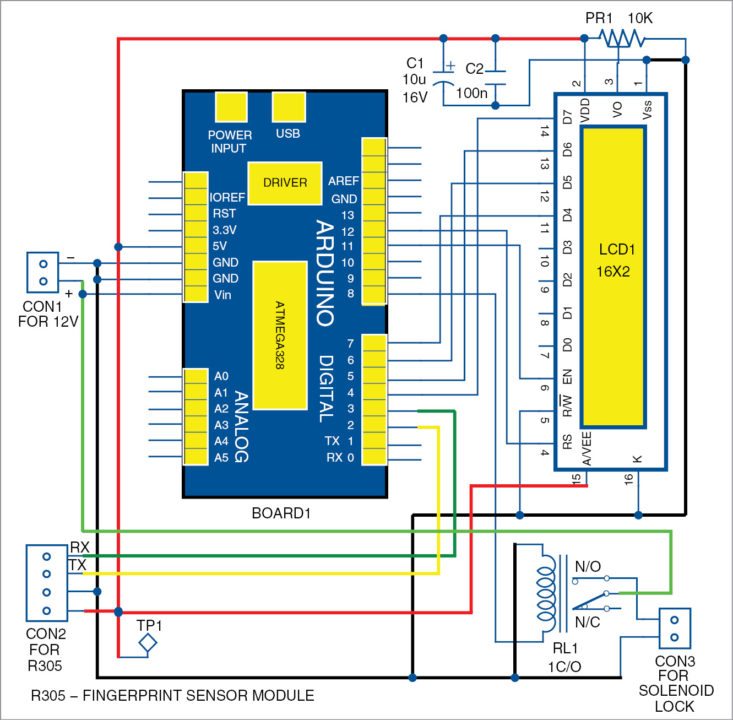
The brain of the circuit is Arduino Uno MCU board (BOARD1). It is based on ATmega328/ATmega328P and has 14 digital input/output (I/O) pins, six analogue inputs, 32k flash memory, 16MHz crystal oscillator, a USB connection, power jack, ICSP header and reset button, among others. It can be programmed using Arduino IDE software.
 Fingerprint sensor module R305 (connected across CON2) has UART interface with direct connections to the MCU or to the PC through max232/USB serial adaptor. The user can store fingerprint data in the module and configure it in 1:1 or 1:N mode for identification. Pins TX and RX of R305 sensor are connected to Arduino digital pins 2 and 3, which are used for serial communication.
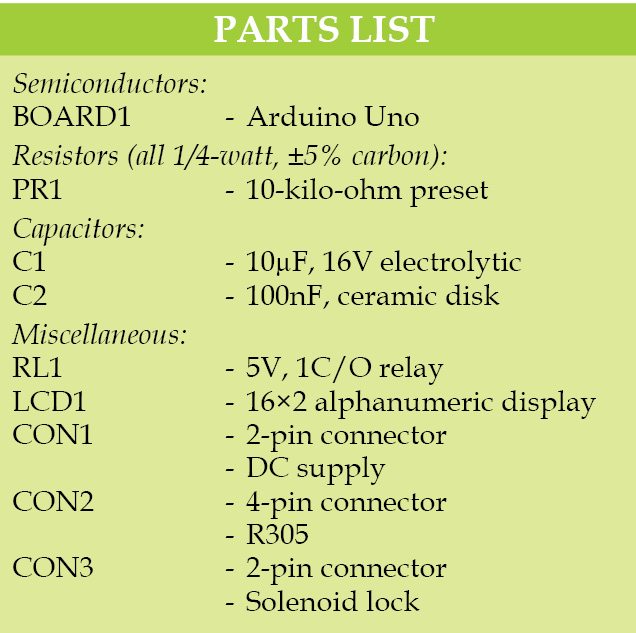 The LCD display (LCD1) is used to display messages during action. Here, a 16×2 display is used; each character is made of 5×7 dot-matrix. Pins 3, 4, 5 and 6 of the LCD are the control lines connected to preset (PR1) output, pin 12 (Arduino), GND and pin 11 (Arduino). Pins 11, 12, 13 and 14 are data pins of the LCD that are connected to pins 7, 6, 5 and 4 of Arduino, respectively. Preset PR1 is used to adjust the contrast of the LCD display.
An electronic door-lock solenoid (connected across connector CON3) is basically an electromagnet made of a big coil of copper wire with an armature (slug of metal) in the middle. When the coil is energised, the slug is pulled into the centre of the coil. This allows the solenoid to move to one end.
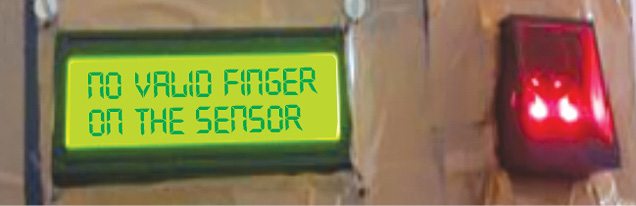
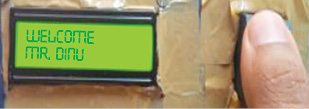
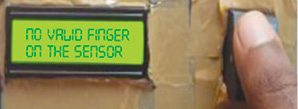
The solenoid lock requires more current than what Arduino can provide. Therefore to operate the lock, a 5V relay (RL1) is used. CON3 is connected between normally open (N/O) contacts of RL1 and GND. The sequence of messages on the LCD from author’s prototype are shown in Figs 2, 3 and 4.
Software
Programs named enroll and fingerprint use different functions like getFingerprintEnroll(int,id), Adafruit_Fingerprint(&mySerial) and getFingerprintEnroll(id). These functions are defined inside the library and pass arguments when called.
After uploading enroll in the Arduino, open serial monitor from Arduino IDE from Tools→Serial monitor options. Change baud rate below the serial monitor window to 38400. Choose Newline option from the same place. Then, follow the instructions on the serial monitor. Place the finger on the fingerprint module. Type any whole number as the ID number. Press Send tab to send the ID number from the serial monitor to Arduino. This fingerprint gets converted into digital data and gets store inside R305 module database.
More than 200 fingerprints can be stored on this system. Make sure that each fingerprint has a unique ID number. This ID number will be used in the next program to identify the authenticated person’s name. The serial monitor will guide the user as to when he or she should place the finger and when to remove it.
For debugging without an LCD display, make the same settings for the serial monitor after uploading Fingerprint program. This is used to compare the fingerprint in the sensor with stored prints. The serial monitor guides here also. The fingerprint program should be edited to change the name and ID numbers according to how users want.
Download source code: click here
Construction and testing
The single-side PCB for the fingerprint door unlock system is shown in Fig. 5 and it’s component layout in Fig. 6. For convenience, we have designed the PCB as an Arduino shield. The users can modify the design as per requirement. Also, they can test PCB with Arduino board using a cable connector.
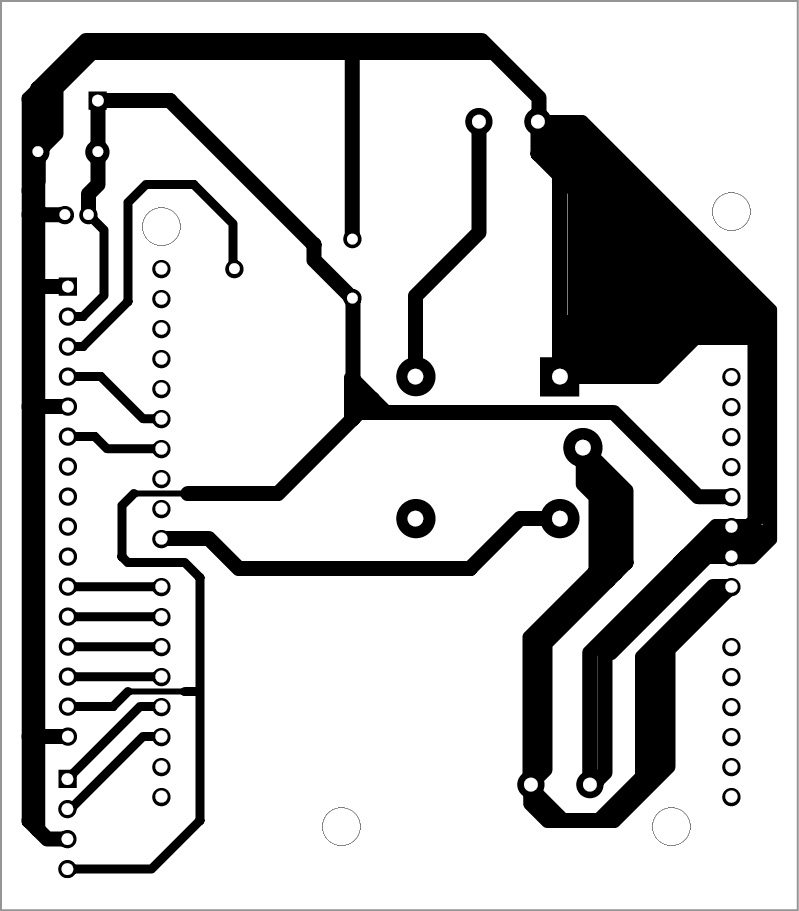
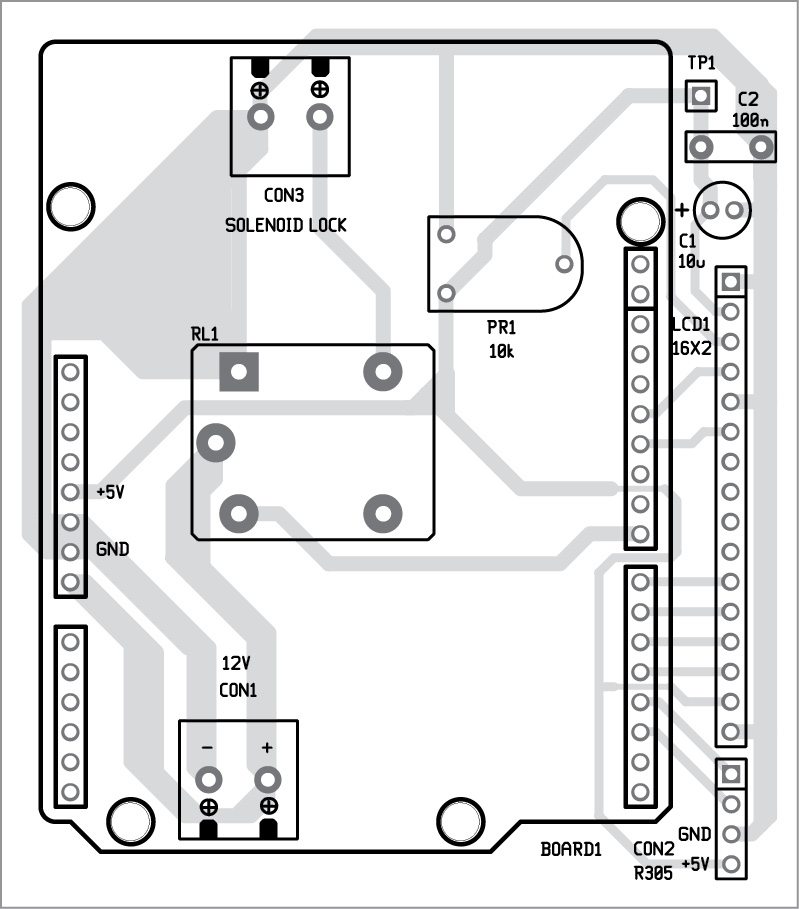
Download PCB and component layout PDFs: click here
Make sure the baud rate given in the program is correct. Baud rate for the serial monitor can be anything but the baud rate for R305 sensor should match that given in its datasheet. Baud rate may vary with different versions of the sensor. It is given in the program like Serial.begin(38400) [baud rate for serial monitor]; finger.begin(57600) [baud rate for sensor]. Reset Arduino board before validation of the fingerprint.
Check more such tested Arduino projects.
Dinu D. and Cinla K. Pappachan are fourth-year BE (ECE) students at Mar Ephraem College of Engineering and Technology, Tamil Nadu. They are also electronics hobbyists
What is baud rate?
It changes for one opreating software to another
please help me… when i entered my finger print second time.. it was gave me.. the unknown error… please tell me how can i remove this error..
Send me the price of the fingerprint door unlocked system
Do you mean the cost of the complete kit of this project? Please contact EFY Associates Kits’n’Spares for the same or visit their website : http://www.kitsnspares.com
I want contact number
I have one. +91 8555841685(hyderabad, india).
+91 8555841685
Hi , can you help me i’m doing a project like that but on pic micocontroller and i have a problem with code can you send me simple code for ON and off the door using the finger print ? Thankyou =)
Mail : [email protected]
Can we connect only R305 finger print module or we can connect any module only by checking its Rx in and Rx out??
Here’s the reply from the author Mr Dinu D. This project will not work with other biometric sensor because the commands for other sensors will be different. To verify this, compare the datasheet of R305 sensor with the other sensor. 99.9% the commands will be different and it won’t work.
Is this cod will also no work with R307?
Can you please tell how to code the microcontroller .
U Help would be very much Appreciable
Thank You Sir
Mail::= [email protected]
Jayat if u got the mail can u please forward it to me.
Thank you
email id= [email protected]
can you give me this project programming ???????
The source code is present on the second page.
Is the code correct
The source code is fully verified by our team.
Download is successful but I can’t open the source code zip file.
please, help me. Thanks you.
Send us Quotation for whole system
I have one for rs.5000 with sample door for presentation purpose. +91 8555841685 (hyderabad)
Awesome work… don’t ever auction it… let the student when ready learn from the teacher. Keep up the good work
Thank you for your feedback.
Does r305 sensor has varities in it or r305 is a standard sensor ?
If I am using another finger print module and using keypad 4*4 than what is my circuit diagram and please send me this type of circuit code we are using arduino.
Please sir reply fast and send me a code or circuit diagram.
Hello
May you help me how to make 2sets of fingerprints for 2 acts . Set 1 for servo1 set 2 for servo2.
Can u explain more clearly
Comment: I need code to simulate pleas
Page 2 u have a source code. Download it.
I have fabricated one in my home and it is working anyone intrested can contact me for more details or help. +91 8555841685. I lives in hyderabad.
I’ve a lot doubts and problems regarding this project to be solved , starting with
1). I uploaded the program to the board but I found nothing in the LCD display,just a blank lit up screen
2). As soon as I connect the relay to the circuit , especially when I try to connect the N/C pin to the 12V supply line the circuit just starts blinking,the leds on the screen, r305 and arduino board starts to blink instead of being steady
so if anyone knows the solution, pls post it fast ,I have just 3 days to submit this
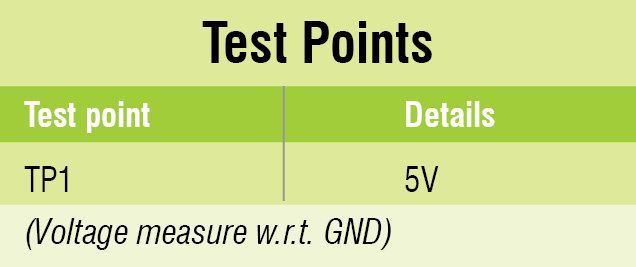
And I also forget to add that , the test point ,what should I connect with it, as far as I’ve searched, I’ve learnt that it is not necessarily needed so I ignored it
If I am wrong ,pls help me with the soln
i am having problem with the code. its showing error. how can i debug it please. below is the error message;
fatal error: Adafruit_Fingerprint.h: no such directory
#include
compilation terminated.
exit status 1
error compiling for board Arduino/Genuino uno.
add the library present with source code in archive file
Anyone tell me what problem you was facing while making and how it overcame from this issue?
is there any specifiction for the solenoid lock used in this project??if so can you please let me know that??
We have used an Elock-S210M electric strike. It is a stainless-steel, fail-secure type electric lock with dimensions of 150x39x31 mm3. Applying electric current to the strike causes it to unlock. Its operating voltage and current are 12V DC and 450mA, respectively.
sir can u please let me know the specifications of solenoid lock used here
please help me with coding
mail id :[email protected]
Kindly elaborate your query.
I am doing almost a similar project although mine is for an attendance management system is to be linked to a human resource system. Can i get some help from you guys
Kindly elaborate your query.
i did like to try out the,project
Sir
Can we use different fingerprint sensor module
Could you please inform me as to what software you used to design the circuit diagram on page 1 and also the PCB and component layout on page 2? Your reply would be greatly appreciated.
gEDA software was used for making circuit diagram and PCB layout (as shown on page 1 and 2) of this article.
Helo sir
In this can we use different
Fingerprint sensor modul
A similar point was asked by someone above. It will not work….
Helo sir can u help me the coding solenoid lock change to LED light
The source code is present at the end of the article.
hi please would the code be also compatible with r307 and r309 fingerprint sensors
can you tell me if this project gives output?
sir i need this project kit
I need the software of this project
fingerprint based ATM with Arduino board is our project, pls give us source code of this projectt
Hello, do you have an ideia to keep the light sensor off until touch the finger?
Thanks!
In order to sense the presence of a finger on the sensor the light must be on
hi team,
kindly help me for this error
Arduino: 1.8.5 (Windows 8), Board: “Arduino/Genuino Uno”
H:\finger\Fingerprint_door_unlock_Arduino\enroll\enroll.ino:1:34: fatal error: Adafruit_Fingerprint.h: No such file or directory
#include
^
compilation terminated.
exit status 1
Error compiling for board Arduino/Genuino Uno.
This report would have more information with
“Show verbose output during compilation”
option enabled in File -> Preferences.
Can’t upload programs enroll and fingerprint to Arduino Uno board.
Error message shown is:
Arduino: 1.8.5 (Windows 10), Board: “Arduino/Genuino Uno”
C:\Users\RUTVIJ~1\AppData\Local\Temp\ccvVHvUp.ltrans0.ltrans.o: In function `__static_initialization_and_destruction_0′:
C:\Users\Rutvij Shah\Desktop\Fingerprint_door_unlock_Arduino\enroll/enroll.ino:27: undefined reference to `Adafruit_Fingerprint::Adafruit_Fingerprint(SoftwareSerial*)’
C:\Users\RUTVIJ~1\AppData\Local\Temp\ccvVHvUp.ltrans0.ltrans.o: In function `setup’:
C:\Users\Rutvij Shah\Desktop\Fingerprint_door_unlock_Arduino\enroll/enroll.ino:35: undefined reference to `Adafruit_Fingerprint::begin(unsigned int)’
C:\Users\Rutvij Shah\Desktop\Fingerprint_door_unlock_Arduino\enroll/enroll.ino:37: undefined reference to `Adafruit_Fingerprint::verifyPassword()’
C:\Users\RUTVIJ~1\AppData\Local\Temp\ccvVHvUp.ltrans0.ltrans.o: In function `getFingerprintEnroll’:
C:\Users\Rutvij Shah\Desktop\Fingerprint_door_unlock_Arduino\enroll/enroll.ino:66: undefined reference to `Adafruit_Fingerprint::getImage()’
C:\Users\Rutvij Shah\Desktop\Fingerprint_door_unlock_Arduino\enroll/enroll.ino:88: undefined reference to `Adafruit_Fingerprint::image2Tz(unsigned char)’
C:\Users\Rutvij Shah\Desktop\Fingerprint_door_unlock_Arduino\enroll/enroll.ino:114: undefined reference to `Adafruit_Fingerprint::getImage()’
C:\Users\Rutvij Shah\Desktop\Fingerprint_door_unlock_Arduino\enroll/enroll.ino:120: undefined reference to `Adafruit_Fingerprint::getImage()’
C:\Users\Rutvij Shah\Desktop\Fingerprint_door_unlock_Arduino\enroll/enroll.ino:142: undefined reference to `Adafruit_Fingerprint::image2Tz(unsigned char)’
C:\Users\Rutvij Shah\Desktop\Fingerprint_door_unlock_Arduino\enroll/enroll.ino:166: undefined reference to `Adafruit_Fingerprint::createModel()’
C:\Users\Rutvij Shah\Desktop\Fingerprint_door_unlock_Arduino\enroll/enroll.ino:181: undefined reference to `Adafruit_Fingerprint::storeModel(unsigned int)’
collect2.exe: error: ld returned 1 exit status
exit status 1
Error compiling for board Arduino/Genuino Uno.
This report would have more information with
“Show verbose output during compilation”
option enabled in File -> Preferences.
Sir can you give me the source code and please tell me the cost of the project kit
Source code is available in this site itself and cost will be less than rupees 6K.
sir can u give me the link of finger print device so that i can buy
Hello,
Can you help me with my Capstone project called “door opener using fingerprint with SMS”. Pls email me at [email protected]
Hyy sir.
Can I use another Security feature like voice recognition after the finger print for cross check?
Hi Sir,
Can I increase the Biometric Fingerprint ID 250 to 500 Templates??.I increased from 162 to 250.How can i increase to 500?Kindly Help !!
Sir plz help…dent the progrm of lock
Kindly elaborate on your query.
please help me… when i entered my finger print second time.. it was gave me.. the unknown error… please tell me how can i remove this error.. sir reply soon
Hello! I have a question … Can u please help me. After the fingerprint is placed on the scanner and it is matched with the database… The door will get open . Bt what if i want to open the door from inside?? We cant use a simple locking mechanism from inside coz if we do so there will be no use of this system the security will get compromised ….
So what can we do for it??
Expecting reply as soon as possible.
I want program of this project
Please I want to get the write up of this project, but not the one using LCD, the one using solenoid lock
How could to change the fingerprint after the system is running
hi, i am looking for a finger access door lock kit. Please share your contact detail, i will contact you and share my details in whatsapp.
my details as below
saroj mahanta
[email protected]
7760774150
The complete kit may be available at Kits’N’Spares. Please contact them on [email protected]
how can I combine both face scanner and finger print scanner, I need a reply please
use this project for reference.
hello sir i need help i was downloaded the code but I see arduino and c++ how would ic use it sir
source code could not download
Hi Ganesh, please refresh the page and redownload.
Hello sir, I need complete inputs and program code and how can we combine enroll and fingerprint code also how can we connect them with each other
Anyone tell me what problem you was facing while making and how it overcame from this issue?
Project will not work with other biometric sensor because the commands for other sensors will be different. So use Fingerprint sensor module R305 only to avoid any problem.
Regards
Really nice and informative post its has lots of knowledge really useful information.