


The vigilance of remote locations on your mobile is an assurance for many individuals across the globe. In our last article, we shared information about intrusion detection using a PIR sensor and how to store captured images on Firebase, an open-source Google Cloud tool.
This time, we have included video storage using the Telegram app. Our proposed setup is illustrated in Fig. 1.
Here, a PIR sensor connected to a Raspberry Pi checks for intruders in a room using a motion sensor. If it detects human movement, it captures frames from the camera and sends them to your Telegram bot.

POC Video Tutorial In English
POC Video Tutorial In Hindi
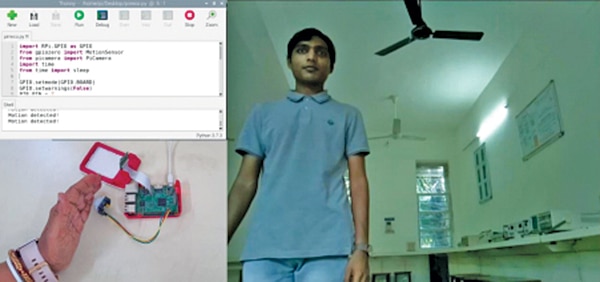
Fig. 1 depicts the author’s prototype of the observation zone where slight hand movements activate the Pi camera, recording a 5-second video. The bill of materials for this bot is listed in Table 1.
| Bill of Materials | ||
| Components | Quantity | Description |
| Raspberry Pi 4b+ (MOD1) | 1 | For programming |
| PIR sensor (S1) | 1 | Motion sensor |
| Pi cam | 1 | 5MP Pi camera |
| Jumper wire | 3 | Female-female jumper |
EFY Note: Additionally, you will need a 16GB SD card and a 5V 2A DC power source if you already have a Raspberry Pi.
Intrusion Detection Circuit Diagram
Fig. 2 shows the circuit diagram of intruder detection using a Pi camera and video storage with the Telegram bot. It is built around Raspberry Pi 4B+ (MOD1), a PIR motion sensor (S1), Pi Camera, and a few jumper wires.

Installation and Setup
We have used Python for programming. Before coding, you need to configure Raspbian OS on the Raspberry Pi and install the necessary Pi camera library files.
To use a Raspberry Pi camera (connected via a ribbon cable), first enable the camera interface in the Raspberry Pi configuration settings. You can do this through the terminal using the following commands:
$ sudo apt-get install python-picamera
$ sudo apt-get installpython3-picamera
You can also enable the camera interface using the Raspberry Pi configuration menu:
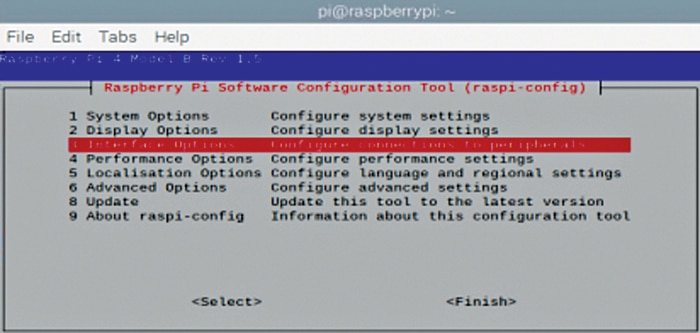
Main Menu →Select Preferences→Raspberry Pi Configuration
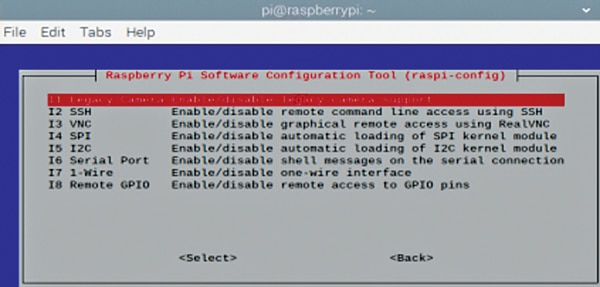
Then, go to the Interfaces tab and enable the camera. Fig. 3 illustrates the Raspberry Pi configuration menu, and Fig. 4 shows the camera-enabling configuration.
After successfully enabling the camera on the Raspberry Pi, it’s recommended to perform software updates. This can be done by running the following Linux commands in the terminal:
$ sudo apt-get update
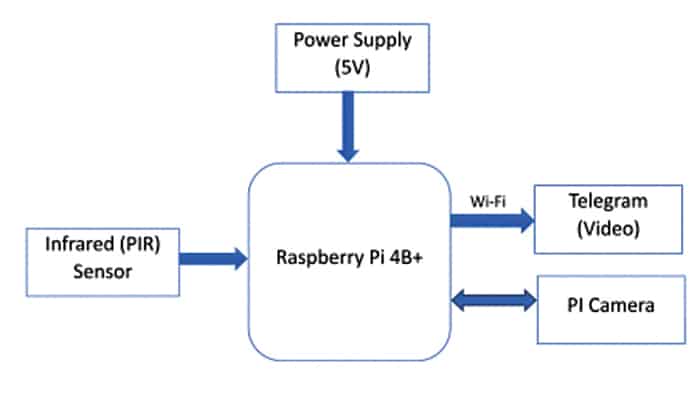
$ sudo apt-get upgradeAfter updating and upgrading, reboot the system. Then, write the Python3/ThonnyIDE code for the bot. Fig. 5 presents a basic block diagram of the proposed setup.
Preparing Telegram Bot
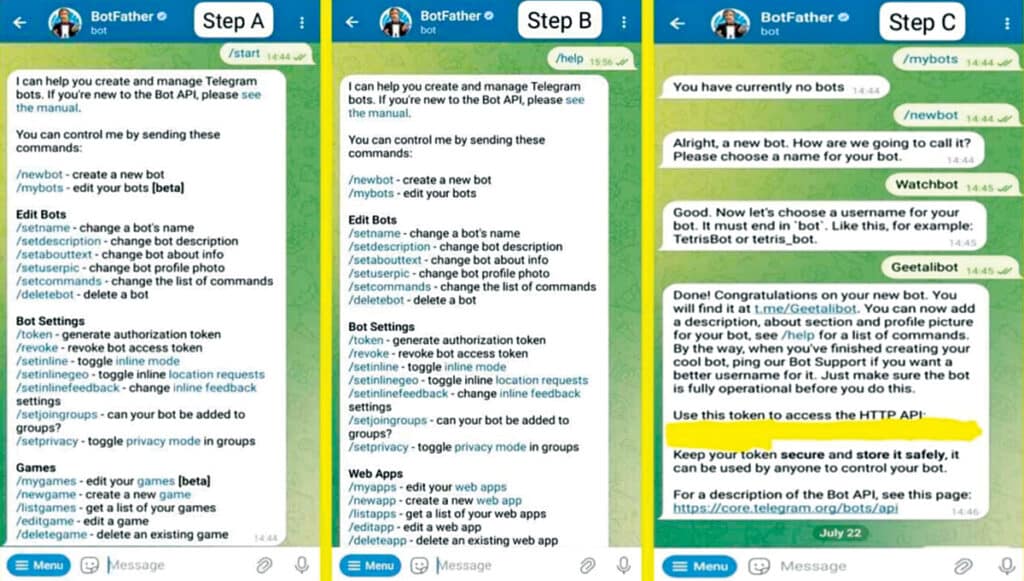
First, prepare a Telegram bot and extract the bot API. Follow the instructions for creating a Telegram bot using the link: https://core.telegram.org/bots/api.
To start using Telegram bots, issue the /start command to the BotFather, who will respond with a list of basic commands. To create a new bot:
- Use the /newbot command
- Provide a name for your bot
- Choose a username for your bot
If the names are available, you’ll obtain the Token and the HTTP API key.
EFY Note: This key is confidential; be careful about sharing it with anyone. Refer to Fig. 6 for a clear understanding of the steps involved in getting the API. Note down the API key to use in your code.
Intrusion Detection System – Code
Next, install the Telegram bot Python module using ‘sudo pip install telepot.’
Note the following points:
1. For the proposed setup, our Telegram bot—Watchbot—can be activated using /start, /ON, or /on, as we’ve programmed it accordingly.
2. The Raspberry Pi, by default, records videos in .H264 format, which needs to be converted to .mp4, the most widely accepted video format.
To test the camera for capturing an image, use the following code snippet:
camera = PiCamera();
camera.start_preview()
camera.capture(path + ‘/pic.jpg’,
resize=(640,480))
time.sleep(2)
camera.stop_preview()
camera.close()
# Sending picture
bot.sendPhoto(id, open(path + ‘/pic.jpg’,‘rb’))
At this stage, we can confirm that the camera is connected to the Raspberry Pi.
Simultaneously, configure the Telegram settings. Fig. 7 provides a visualization of obtaining video through Telegram.

Connecting Raspberry Pi to Telegram BoT
Once the bot is created, the next step is developing the Python code that interacts with the bot and receives commands. Open an editor on the Raspberry Pi to develop the code for connecting the Raspberry Pi to the Telegram bot.
We used Python3 IDE, and testing is shared in the final part. Create a new file and name it telegrm_video.py:
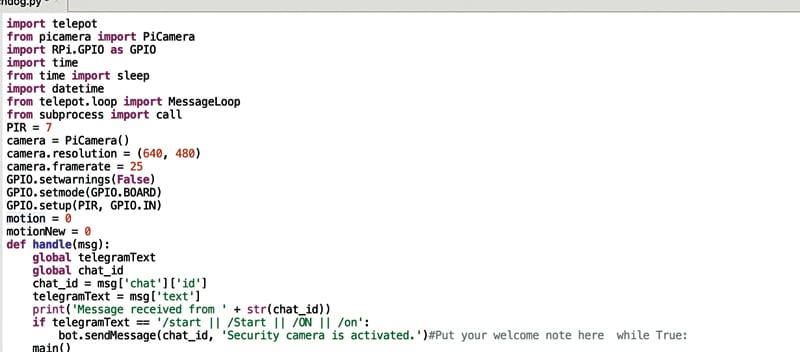
In the code, first, import the required libraries, initialize the message loop, import calls, and set up the camera characteristics and GPIO pins for the sensor.
Initialize the chat ID, message text for display, and the correct key and initialization text.
You can place the welcome message and the loop for checking motion, capturing video frames, and converting them into .mp4. Fig. 9 shows an example code snippet for the API key.
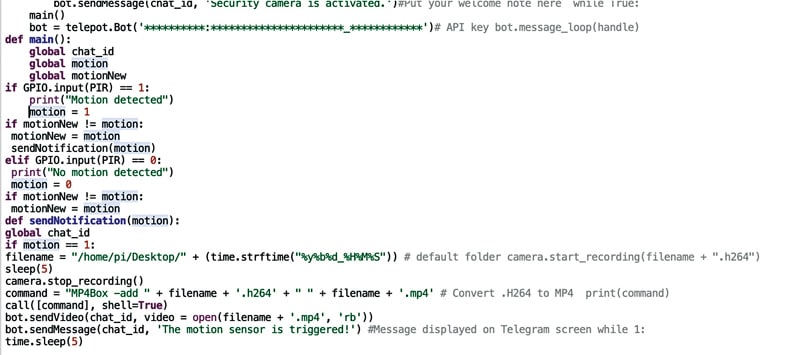
EFY Note: 1. Ensure correct video conversion using MP4Box.
2. Insert the bot.send commands to share the video file and text message.
command=“MP4Box -add “+filename+ ‘.h264’
+“ “+filename+ ‘.mp4’ # Convert .h264 to MP4
bot.sendVideo(chat_id, video =
open(filename + ‘.mp4’, ‘rb’))
bot.sendMessage(chat_id, ‘The motion
sensor is triggered!’)
Construction and Testing
Connect the camera to the Raspberry Pi camera port and then connect the PIR motion sensor according to the circuit diagram given in Fig. 2.
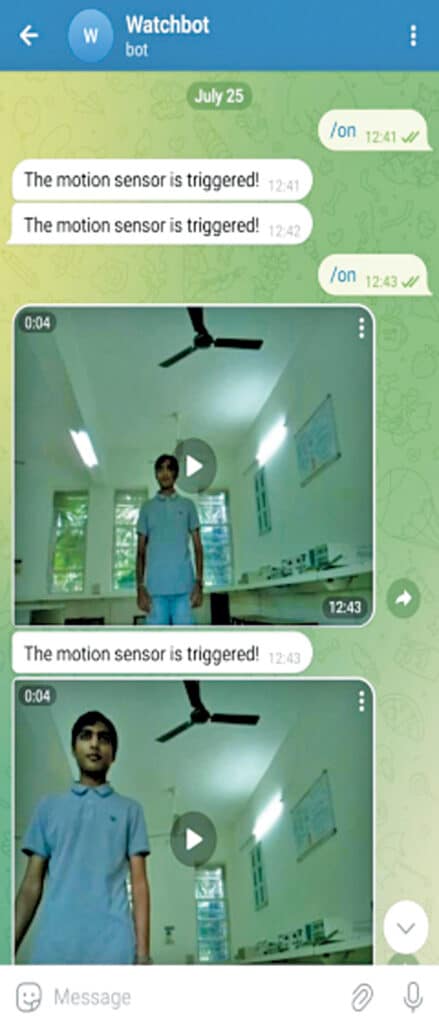
Power the Raspberry Pi, connect it to a Wi-Fi network and the internet and run the code. Create motion in front of the motion sensor. It will capture the video frames, convert them into .mp4, and send them to the connected Telegram bot on your phone or device.
Fig. 10 shows the author’s Intrusion Detection Telegram bot – Watchbot screenshot with glimpses of the video storage code.
Just like this project, explore other interesting Raspberry Pi Projects.
Dr Geetali Saha is associated with the Department of Electronics and Communication at GCET, Anand, Gujarat. Under her guidance, Parth Shah from the final year IT Engineering Department has successfully implemented this bot.