


This Wi-Fi controlled robot can be controlled from anywhere using the ARMA IoT shield for UNO and the Blynk App which provides the user interface.
Overview
Simple WiFi Controlled Robot Using ARMA IoT and Blynk!

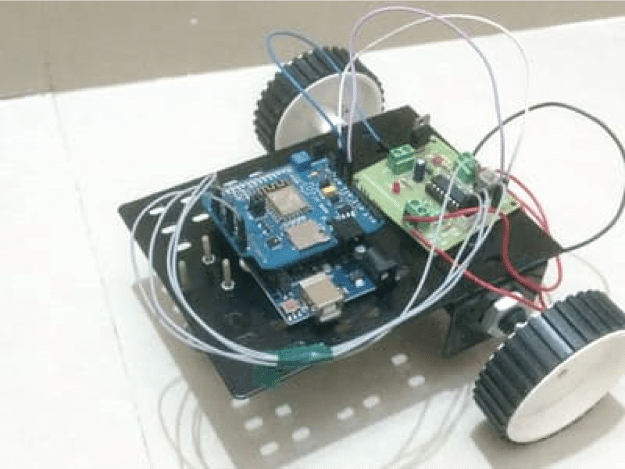
This project uses an Arduino Uno connected to the WiFi using an ARMA IoT shield and controlled using Blynk app which is available for both iOS as well as Android. The chassis is a simple one made from pressed sheet metal with high gauge thickness.
Things used in this project
Hardware components:
| Components | Number of Items |
| Arduino UNO & Genuino UNO | 1 |
| Texas Instruments Dual H-Bridge motor drivers L293D | 1 |
| Mektrasys ARMA IoT | 1 |
| Jumper wires (generic) | 1 |
| USB-A to B Cable | 1 |
| sheet metal robotic chasiss | 1 |
| geared dc motors | 2 |
| wheels for dc motor | 1 |
| castor wheel | 1 |
| nut and screw for fastening castor wheel | 3 |
| 12V battery charger cum adapter | 1 |
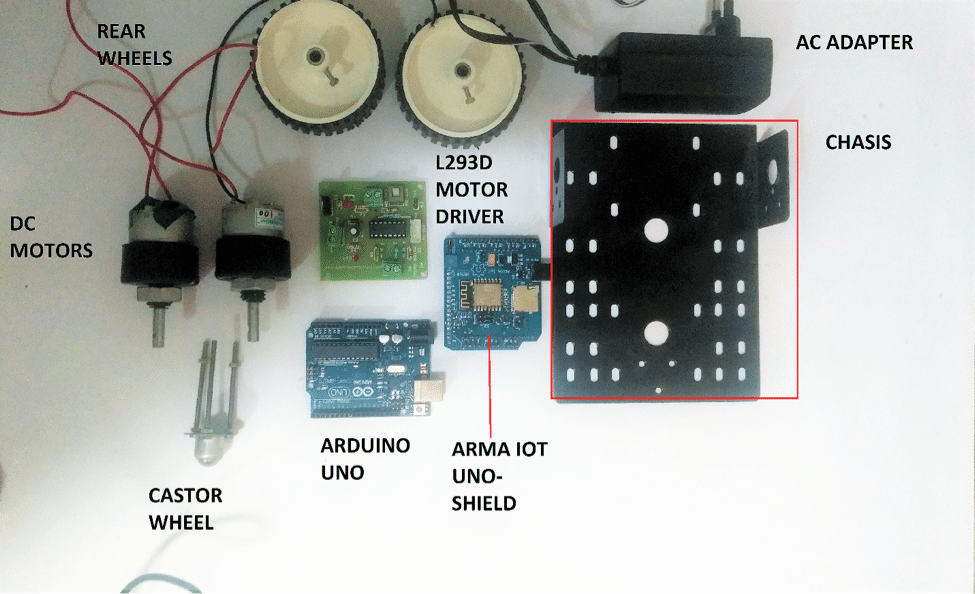

The motors used are geared DC motors with a rated speed of 100 RPM, it works on 12 V power supply given through the motor driver module. The rear wheels are made of virgin plastic of 680 mm diameter. The castor wheel is mounted on the Chassis using nut and screws. All the boards fit on the Chassis and are attached using screws.
The video below illustrates how to develop this project and get it up and running.
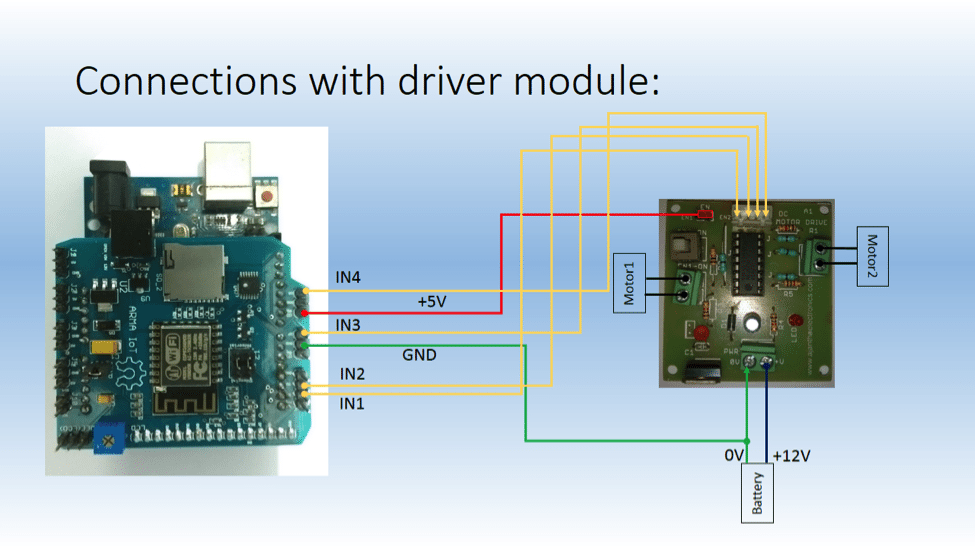
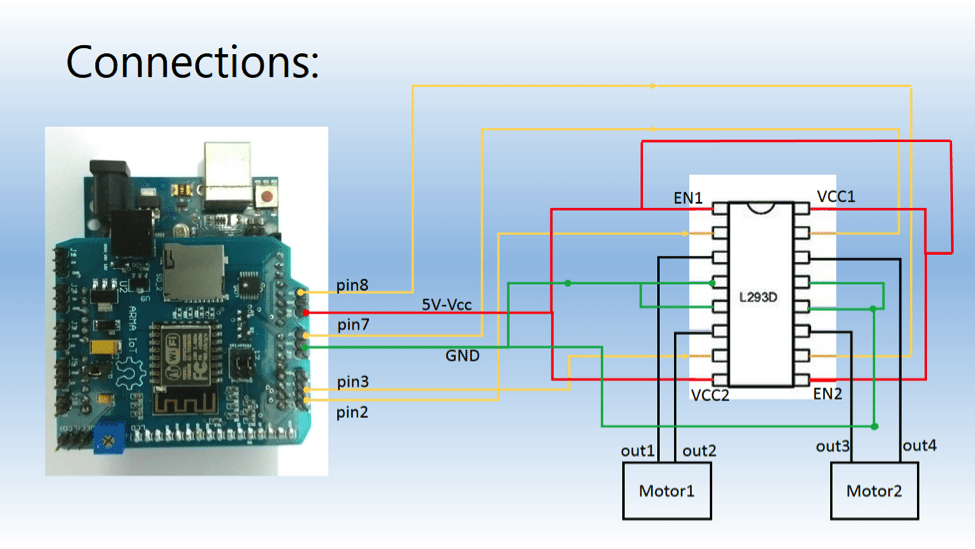
The Schematics include the connections for L293D motor driver and ARMA IoT.
 Bot Assembly Instructions
• Upload the code into the Arduino UNO given in our GitHub repository.
• Place the ARMA IoT shield on the Arduino UNO.
• Assemble the Chassis and fix the L293D driver module and the Arduino on it.
• Make the connections according to the the schematics given.
• Power up the ARMA IoT shield.
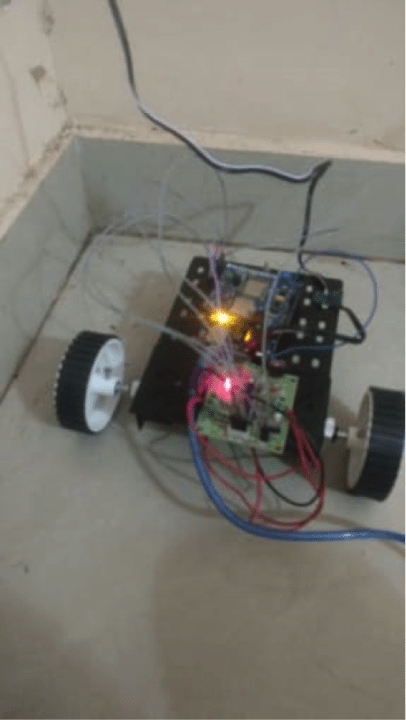
Now the Robot is ready to operate
Blynk UI tutorial
• Open the Blynk app and create a new project.
• Select the Button icon and place it conveniently on the screen.
• Select 3 more button icons and place it as shown.
• Set the pins associated with each button.
• The top two Buttons control the left motor and the bottom two buttons control the right motor.
• Press the play button to activate the program.
The Project is now live and ready to go!
Control your robot using the buttons in the Blynk UI, each button controls a motor in a particular direction. With the right combination of buttons, the robot can be made to forward, backward, turn left or right or rotate on the spot.
This project is meant for beginners to understand the basics of hardware interfacing with Arduino and basic guideline on how to use the ARMA IoT shield. It is also meant to show the simplicity of making projects with ARMA IoT shield and the time saved to get your project up and running. This is a simple example of what the shield is capable of when it is powered by the Blynk app.
Schematics
Code
Blynk is a platform with iOS and Android apps to control Arduino, Raspberry Pi and the likes over the Internet.You can easily build graphic interfaces for all your projects by simply dragging and dropping widgets.
Downloads, docs, tutorials: http://www.blynk.cc
* This example code is in public domain.
* This example shows how to use ESP8266 Shield (with AT commands) to connect your project to Blynk.
Note: Ensure a stable serial connection to ESP8266!
Firmware version 1.0.0 (AT v0.22) is needed.
You can change ESP baud rate. Connect to AT console and call: AT+UART_DEF=9600,8,1,0,0
In general, Soft Serial may be unstable. It is highly recommended to switch to Hard Serial. Change WiFi ssid, pass, and Blynk auth token to run
**************************************************************
#define BLYNK_PRINT Serial // Comment this out to disable prints and save space
#include
#include
// You should get Auth Token in the Blynk App.
char auth[] = “5a9ef0a7de964d62b447951e2993141b”; //auth token
// Your WiFi credentials.
// Set password to “” for open networks.
char ssid[] = “Wi-Fi Id”; //wi-fi ID, it is case sensitve and blank space between characters matter
char pass[] = “Wi-Fi Password”; //wifi password
#include
// Your ESP8266 baud rate:
#define ESP8266_BAUD 115200 // set serial monitor baud rate to 115200 as well
ESP8266 wifi(&Serial);
void setup()
{
// Set console baud rate
Serial.begin(115200);
delay(10);
// Set ESPop8266 baud rate
Serial.begin(ESP8266_BAUD);
delay(10);
Blynk.begin(auth, wifi, ssid, pass);
}
void loop()
{
Blynk.run();
}

I want to buy this project
Hi Sheetal,
This is an untested prototype project. As of now, we do not sell this project.