


Modern agriculture requires efficient resource management and real-time monitoring to ensure optimal crop growth. However, traditional methods often rely on labour-intensive manual checks, which are impractical for remote or large-scale farms. This results in inefficient irrigation, reduced crop yields, and wasted resources.
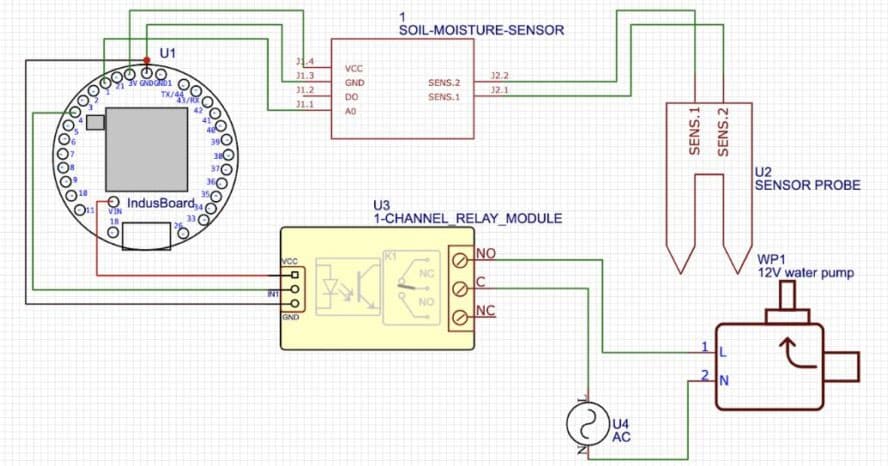
The IoT ThingSpeak Dashboard and Controller project solves these issues by leveraging the IndusBoard Coin’s built-in Wi-Fi and sensors to create a smart agriculture solution. Integrated with a soil moisture sensor, onboard temperature and light sensors, and a relay module, the system collects real-time data on soil moisture, temperature, and light intensity. This data is uploaded to a ThingSpeak channel every 15 seconds.
Using an intuitive ThingSpeak dashboard, farmers can monitor environmental conditions and remotely control a water pump via React and ThingHTTP apps. This enables efficient irrigation management from anywhere—boosting crop productivity and conserving resources.

Table of Contents
Bill of Materials
| Components | Quantity |
| IndusBoard Coin (ESP32-S2) | 1 |
| Soil Moisture Sensor | 1 |
| Relay Module | 1 |
| USB Type-C Cable | 1 |
| 3.3V Battery / 3.3V–5V Power Supply | 1 |
| 3D Printed Case for Device | 1 |
ThingSpeak Configuration
Before writing the code for your device, you need to configure the ThingSpeak dashboard. Follow these steps:
Sign Up and Create a Channel
- Visit ThingSpeak and sign up or log in.
- Navigate to Channels > My Channels and click New Channel.
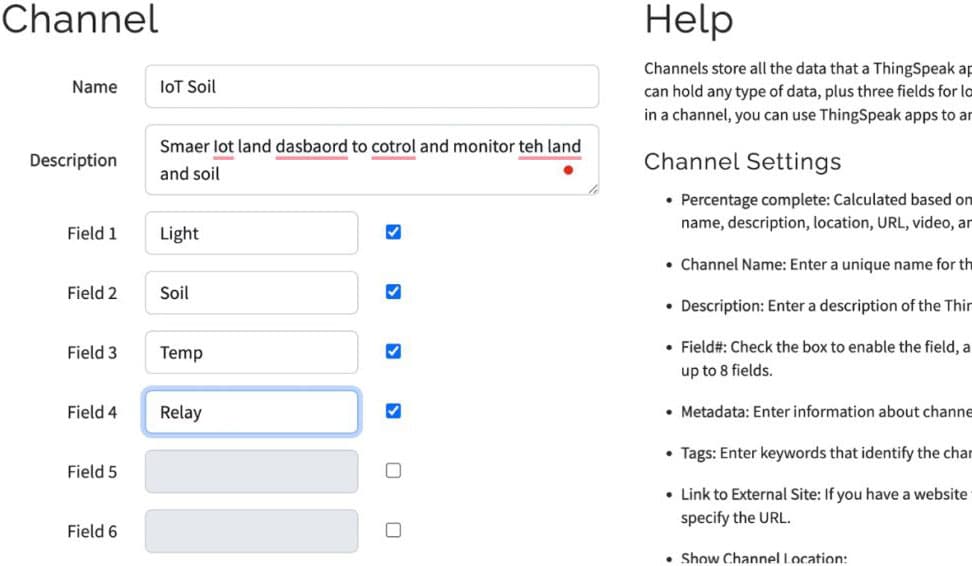
- Configure the channel:
- Name: e.g., “Soil Monitoring”
- Field 1: Soil Moisture (%)
- Field 2: Light Intensity (Lux)
- Field 3: Temperature (°C)
- Field 4: Relay Status (0 = OFF, 1 = ON)
- Save the channel.
- Note the Channel ID and Write API Key from the API Keys tab.
Add Visualizations
- Go to the Private View or Public View tab of your channel.
- Click Add Visualisations and create charts:
- Field 1: Line chart for soil moisture (%)
- Field 2: Line chart for light intensity (Lux)
- Field 3: Line chart for temperature (°C)
- Field 4: Gauge or status indicator for relay status

Coding
Once the ThingSpeak dashboard is set up and the API is configured, you can write the code. Start by entering your Wi-Fi SSID and password in the code. Then, input your ThingSpeak Write API Key in the API section of the code and upload it to the IndusBoard.
A complete version of the code can be downloaded at the end of this article.
Connection
Testing
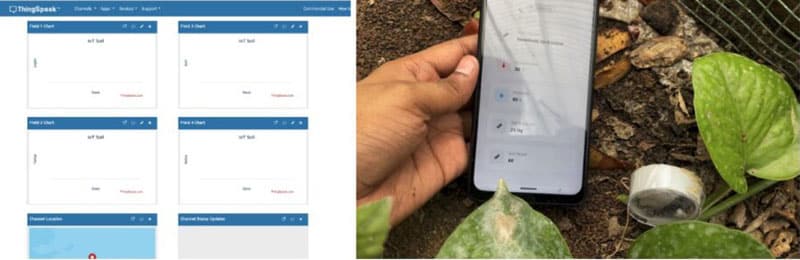
After powering the device, go to your ThingSpeak channel dashboard. You should see real-time data displayed as:
- Line charts for soil moisture, light intensity, and temperature
- A gauge or status indicator for the relay status (0 for OFF, 1 for ON)
These values update every 15 seconds.
Testing the Relay
- Click the ON button in the dashboard to write 1 to Field 4. This should activate the water pump, and the Serial Monitor will log:
"Relay set to: ON" - Click the OFF button to write 0 to Field 4. The pump should turn off, and the Serial Monitor will confirm:
"Relay set to: OFF"
Troubleshooting
- No Data on ThingSpeak?
Check Wi-Fi credentials, internet connectivity, and the Write API Key. Ensure your network has stable internet access. - Relay Not Responding?
Verify the ThingHTTP URL, IndusBoard IP and port, and the relay’s wiring and HIGH/LOW logic configuration. - Incorrect Sensor Readings?
If the soil moisture readings fall outside the 0–100% range, consider calibrating the sensor or checking the wiring for loose connections.
