This AVR microcontroller-based global positioning system (GPS) receiver can be used to find the exact location of a place and know its standard time. It provides the data corresponding to its position on international standard latitude-longitude basis and also the standard coordinated universal time (UTC) along with some more information received from the nearest satellite assigned for this purpose. (UTC is the primary time standard by which the world regulates clocks and time.)

It can prove useful in remote areas where no other wireless network such as the cellphone or the Internet is available. It can also be used for research and other sophisticated applications.
Circuit and working

Fig. 1 shows the block diagram of the standalone GPS receiver with liquid crystal display (LCD). The system consists of a GPS receiver module that collects data from the satellite, Atmega16 microcontroller for processing the received signal, power supply section and LCD for displaying the latitude, longitude and time.
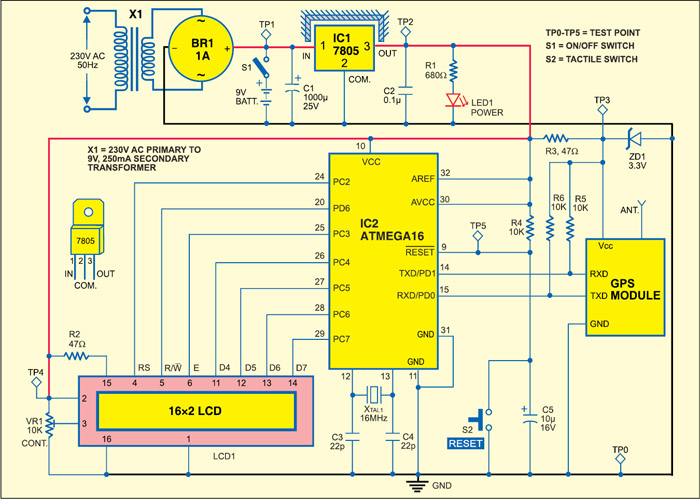
The complete circuit is shown in Fig. 2. The connection setup is simple. All you need is a 3-wire cable for connecting the GPS module to the microcontroller. Transmit pin (TXD) of the GPS module is connected to receive pin (RXD) of the microcontroller (IC2). Resistors R6 and R5 are used to pull the pins high when in idle mode. However, in this circuit, these two resistors are optional because port D of ATmega16 has internal pull-ups.
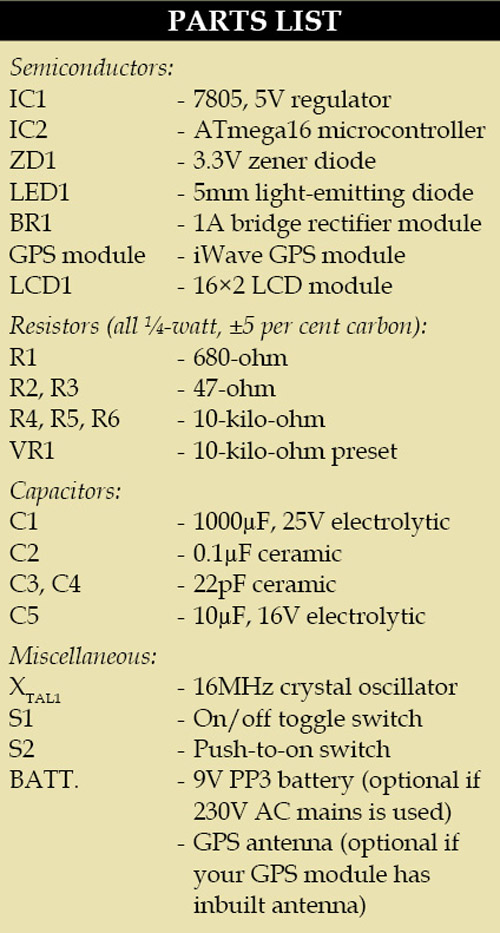
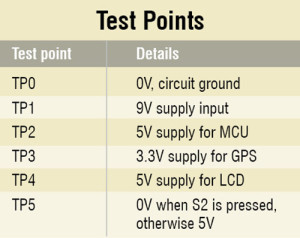
Power supply. To derive the power supply for the circuit, 230V AC mains is stepped down by a 9V, 250mA secondary transformer, rectified by bridge rectifier module BR1 and filtered by capacitor C1. The voltage is regulated by a 7805 regulator. LED1 glows to indicate the presence of power in the circuit. The regulated 5V DC powers the microcontroller and the LCD. Zener diode ZD1 converts 5V into 3.3V for the GPS module.
You can also use a 9V AC mains adaptor or 9V battery for the circuit. Switch S1 is used to connect the battery to the circuit.
LCD. The project uses a 16×2, Hitachi HD44780-controlled LCD module. The 16-character, 2-line LCD module normally has eight data lines (D0 through D7) for data transfer. In this project, only four data lines (D4 through D7) are used for data transfer. Bus lines D0 through D3 are disabled. Data transfer between HD44780 and the microcontroller completes after the 4-bit data is transferred twice.
Port-C pins PC4 through PC7 of the microcontroller (IC2) are connected to data lines D4 through D7 of the LCD. LCD control lines—read/write (R/W), register-select (RS) and enable (E)—are connected to PD6, PC2 and PC3 of IC2, respectively.
GPS module. We have used an iWave GPS module with external antenna (refer Fig. 3). The module requires a 3.3V DC supply.
The GPS receiver receives the latitudinal and longitudinal data from the satellite. This data provides the exact position of the receiver on the Earth’s surface and also the real time. With the latitude and longitude information, you can view the location from the standard map. The latitude and longitude data obtained can also be entered into any freely available software such as itouchmap available from http://itouchmap.com/latlong.html, where you can view the exact location of any point on earth. You can also get the map from http://www.mapsofworld.com/lat_long/india-lat-long.html


You can also use Google Maps for locating the place. It is the common software used for this purpose. You just need to type the latitude and longitude in standard format. For example, enter 28.52, 77.22 in its search box and press ‘Search’ tab to view the location. It will show you the location somewhere in south
Delhi.


Very good project indeed.
Want to know, how the satellite data is received by the GPS module?
Also where can I get the EFY Dec. 2011 issue? or any link?
Thanks for the feedback! Some details of the GPS module can be found from here :http://www.iwavejapan.co.jp/product/iW%20pdf%20files/iW-GPS-01b.pdf More detail can be found from its datasheets. You can get back issues of EFY from our online stores like efymagonline.com, magzter.com, pothi.com, lulu.com, amazon.com, etc