


 The system presented here monitor live temperature through the Internet of Things (IoT)-based system using IBM Bluemix cloud platform and Mbed NXP LPC1768 development board.
Developed by IBM, IBM Bluemix cloud platform supports several programming languages and services as well as integrated DevOps to build, run, deploy and manage applications on the cloud. IBM has come up with a series of platforms for developing applications for the IoT. Three platforms, namely, IBM Bluemix, IBM Watson and Node RED, are used to connect devices, collect data, publish on the cloud and create applications on the Web.
The sensor device streams data over Ethernet, which is further published on the cloud using programming and IBM platforms.

This IoT project also uses Message Queuing Telemetry Transport (MQTT) protocol to update/publish sensor data to the IoT cloud/broker. For details on MQTT, refer to “Use MQTT Protocol In Smartphones And Raspberry Pi” DIY article published in November issue.
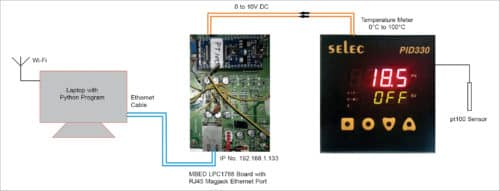
The block diagram for streaming live sensor data from a temperature sensor to IBM Bluemix using ARM Mbed microcontroller (MCU) and Python program is shown in Fig. 1. The temperature meter is a locally-available, low-cost SELEC-make meter, connected to PT100 sensor. It has 0V DC to 10V DC output corresponding to 0°C to 100°C. You can use a temperature meter of any make with 0V to 10V output between zero to hundred degrees.

Hardware and firmware
Voltage output from the temperature meter is collected through ARM Mbed module having Ethernet connectivity. The MCU, running an embedded firmware (bluemix_main.cpp) server, is programmed for a static IP address, 192.168.1.133, and is connected to the intermediate PC that reads data from the MCU and publishes it on the cloud using Python program.
It is possible to connect sensors to the MCU and build a sensor device with suitable firmware. Such device firmware can easily be built using ARM Mbed MCU. For more details and examples, refer to www.mbed.com
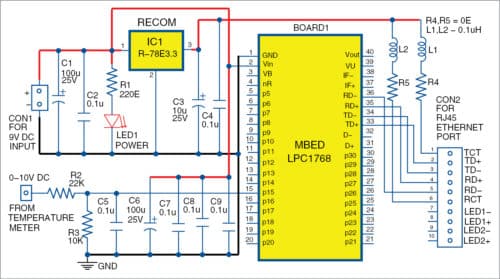
The temperature meter is connected to Mbed LPC1768 MCU, as shown in Fig. 2. The internal hardware circuit along with power supply and RJ45 Ethernet patch cable connector is shown in Fig. 3.
To check PC connectivity with the MCU via Ethernet port, enter the following command in DOS command prompt of Windows:
ping 192.168.1.133 –t
You will see the system response, as shown in Fig. 4.

In this example, you can read data by entering the URL in the browser:
This URL will be different in your case; change https://192.168.1.133/ defined in the code, accordingly.
Software development
Firmware
Mbed is an IoT platform for Internet-connected devices based on 32-bit ARM Cortex-M MCUs. Applications can be developed using the free Mbed online IDE, an online code editor and compiler. Since the Mbed project is compiled on the cloud, using the built-in C++ compiler, simply a Web browser is needed on the local PC. You can open the compiler from the link.
The online compiler enables you to either write your code from scratch, or import an existing project and modify it to suit your needs. The only thing you need is an account and login credentials to proceed with project development.
The firmware code (bluemix_main.cpp) written in C++ is required to be programmed into the flash of Mbed LPC1768 MCU to build the digital thermometer server. The program (bluemix_main.cpp) updates/publishes data to the IoT cloud/broker every fifteen seconds from a PC running Python 2.7.13.
Download Source Folder
Python programming
To use the IoT with Python, you need ibmiotf, a free library that must be installed on Windows PC by following the steps below:
- Download and install Python 2.7.13 module.
- Install the latest version of the library with pip command. Dependencies include paho-mqtt, iso8601, pytz and requests.
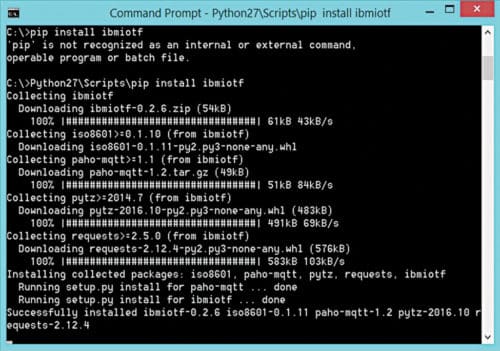
- To install the library for Windows, enter the following command:
C:\>Python27\Scripts\pip install ibmiotf
The command prompt window is as shown in Fig. 5.
One important function used in Python code (bluemix_iot.py) is def myfn(). It is used for collecting data from the IP address using HTTP. Tempvalue is used as a variable to hold data. The given code publishes the last value of captured data on the cloud at all pre-determined intervals.
Python sensor gateway is the frontend software installed on the PC having an Internet connection via Wi-Fi. As shown in Fig. 2, Mbed LPC1768 MCU is connected to the PC/laptop via its LAN port. Python program (bluemix_iot.py) has all the functions to read sensor data from the sensor through the Ethernet port of Mbed NXP LPC1768 board.
Please note that Internet connection on the PC through Wi-Fi is preferred without any proxy restrictions. During testing, the Internet connection was obtained through a Wi-Fi hotspot on a smartphone.
After the hardware is set up, upload the firmware to Mbed LPC1768 board and install Python sensor gateway. The next step is to configure IBM cloud platform and stream sensor data on the cloud.
Configuring IBM Bluemix cloud platform
The steps for configuring IBM Bluemix Cloud platform are given below.
Go to www.bluemix.net and click on Create an IBM Cloud account to create a free account. Fill in your valid email ID, name, country, phone number and password. You will find confirmation for the account in your email. Open your email and click on the link sent during registration. (Please remember that the free account with this email will be valid for one month only.)
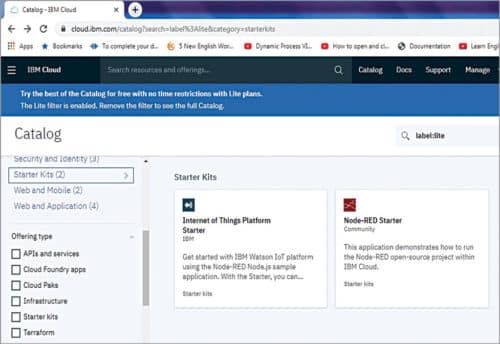
Login to IBM cloud and select Catalog. A window will appear, as shown in Fig. 6.
Click Starter KitsInternet of Things Platform Starter.
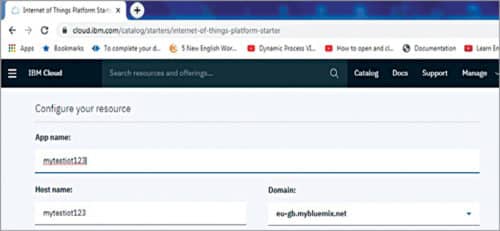
Enter App name (for example, mytestiot123) and click on Create from the Windows, as shown in Fig. 7.
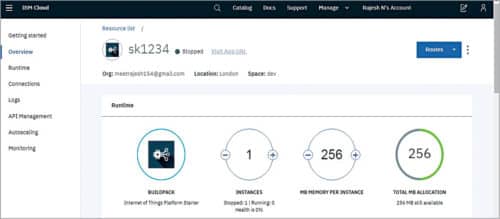
The dashboard will look like as shown in Fig. 8. Select sk1234 name.
Click on Connections on the left. Then click on connection name (Sk1234-iotf-service in this case).
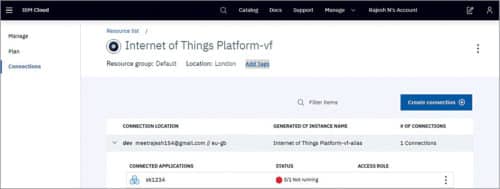
Next, click on Internet of Things Platform. A window will appear as shown in Fig. 9.
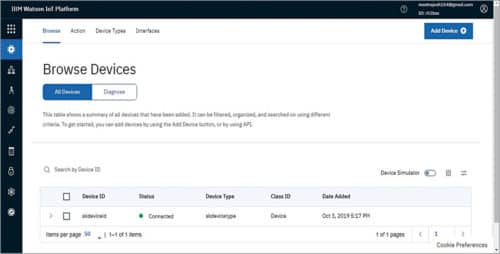
Click on Manage on the next screen. You will see a Launch button. Click on it and you will see Add Device button at the top-right corner, as shown in Fig. 10. Click on it.
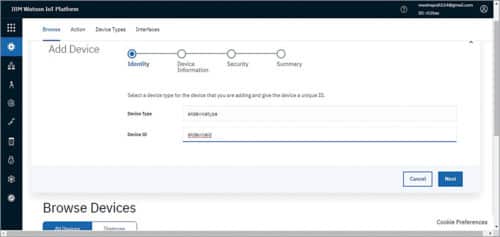
Now, create Device Type and Device ID, as shown in Fig. 11, and click on Next.
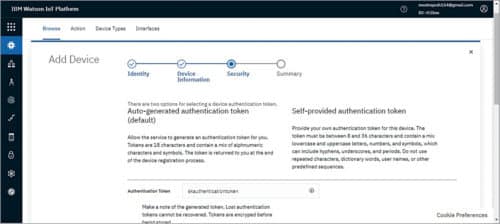
Do not do anything on the next screen, just click on Next.
A token will be generated and added, as shown in Fig. 12. Note down these details because you will need the token, device ID and device type details in Python program later.
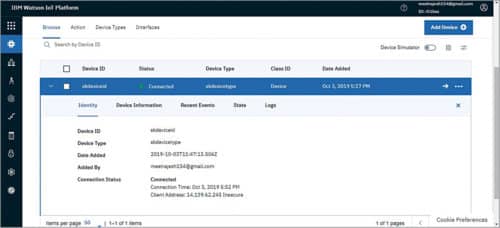
Connection status will be as shown in Fig. 13.
Remember to change security level to TLS Optional, otherwise it will not allow you to publish.
Open Python code and enter your device ID, type and authetication token. A typical example of Python program with device ID is shown in Fig. 14.
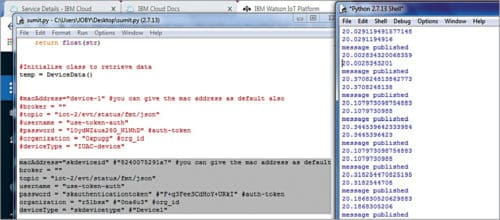
Next, run Python program to read and publish temperature data to the cloud from the PC connected to the temperature meter.
Data can be displayed on a line chart, bar graph, gauge and so on. You can view the data better on the screen using any one of these options. These options can be added using Card on IBM Bluemix cloud. In our case, a gauge was selected for viewing online temperature.
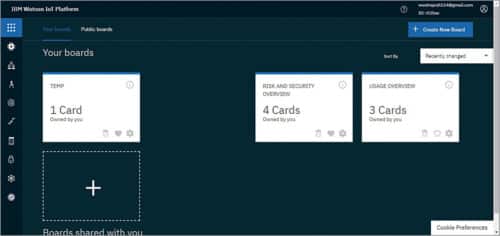
First, open IBM cloud, click on Boards to create a board, as shown in Fig. 15.
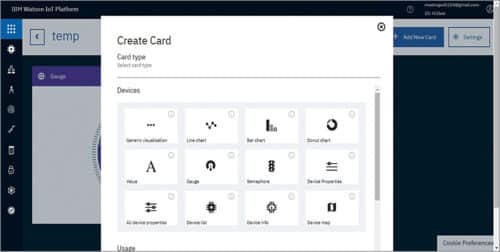
Then create a card on Create Card window, as shown in Fig. 16.
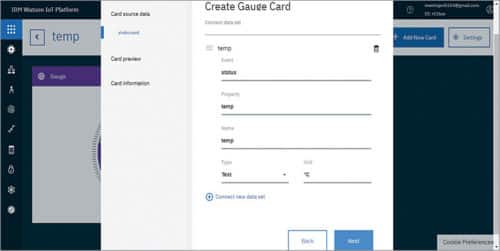
Next, a screen will appear with device ID (for eaxmple, Skdeviceid in this case), as shown in Fig. 17. Click on Next.
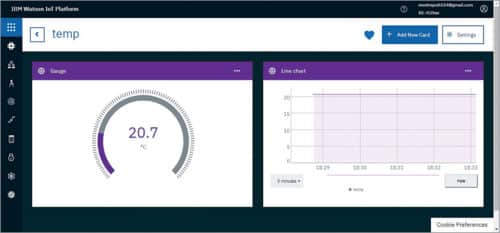
Temperature data will appear on screen that will show sensor data on gauge and line chart, as shown in Fig. 18.
For more such useful IoT projects you can visit here.
Dr Joby Antony is working as Engineer-F at Inter-University Accelerator Centre (IUAC), New Delhi. He got his masters degree from the US and PhD from IIT, Dhanbad
Kriti Kushwaha is working as advanced application engineer at Accenture Technology Labs, India, developing machine learning applications towards R&D solutions
Alan J. Antony is pursuing dual degree (BTech + MSc) from BITS Pilani, Goa campus, and is an IoT enthusiast
Please make a video tutorial on how to make this project. Please 🙂