


 You can easily convert your ordinary docking station into a smart electronic laptop docking station with an anti-theft alarm. The circuit presented here can help you in doing so.
Smart laptop docking station circuit
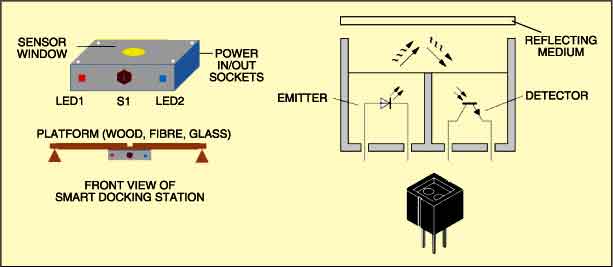
The add-on sensor circuit required for this is built around IC CNY70 (IC1) and IC CD4060 (IC2) as shown below. IC CNY70 is an integrated reflective-type opto-sensor that contains a phototransistor and an infrared LED. The LED emits infrared light and the transistor works as a receiver. The current flowing through the phototransistor depends on the intensity of the light detected.

IC CD4060 is a 14-stage ripple-carry binary counter. The counter is reset to zero by a gating positive voltage at the reset input independent of a clock.

Power supply to the circuit is derived from AC mains by using step-down transformer X1. The transformer output is rectified by a full-wave bridge rectifier comprising diodes D1 through D4 and smoothed by capacitor C1.
When power switch S1 is in ‘on’ position, the circuit gets the power supply and power-on indicator LED1 lights up. At the same time, the mains socket also gets the AC mains supply. This mains socket can be used to connect the laptop charger and/or a desktop lamp, etc.
Circuit operation
Working of the circuit is simple. When the laptop is in the docking station, the phototransistor inside IC1 receives the IR light from the LED, reflected by the laptop surface. The phototransistor conducts to make reset pin 12 of IC2 high, so IC2 does not oscillate.
When someone lifts up the laptop from the docking station, the phototransistor cuts off and pin 12 of IC2 goes low. As a result, IC2 starts oscillating. After a few seconds, delay pin 3 of IC2 goes high to drive transistor T1. The piezo buzzer starts beeping to raise an alert and the LED2 glows to indicate that someone has stolen the laptop from the dockyard.
Construction & testing
The simplicity of the circuit makes it ideal for construction on a small PCB. After completion of wiring, check the circuit for proper functioning of all the sections and enclose the unit in a suitable ABS case. Mount the finished unit beneath the docking station using small screws/double-sided glue pads so that the opto-sensor is exactly at the centre of the docking-station base plate. Refer Fig. 2 for the arrangement. If your laptop computer is black in colour, it will reflect far less IR light. You can overcome this drawback by attaching a white sticker suitably at the bottom of the laptop.
Calibrate the circuit before first use. Set preset VR1 at the centre and place the laptop in the docking station. Now turn VR1 slowly until IC2 goes to stand by (no-oscillation) mode. Then remove the laptop from the docking station, ensure that IC2 is enabled(pin 12 is low) and wait for the alarm sound. Repeat the process and adjust VR1 until you get the correct result.
Note that the LED in the opto-sensor is permanently powered via resistor R2. Similarly, you are free to experiment with the values of IC2 timing components C5, R3 and R4 for increasing or decreasing the delay time.
EFY note
During testing at EFY Lab, we used CX sensor from OMRON in place of CNY70.
The project was first published in November 2010 and has recently been updated.
